Case Studies
Learn shrink wrap skills from the experts. If you can’t find the answer you need, feel free to get in touch.
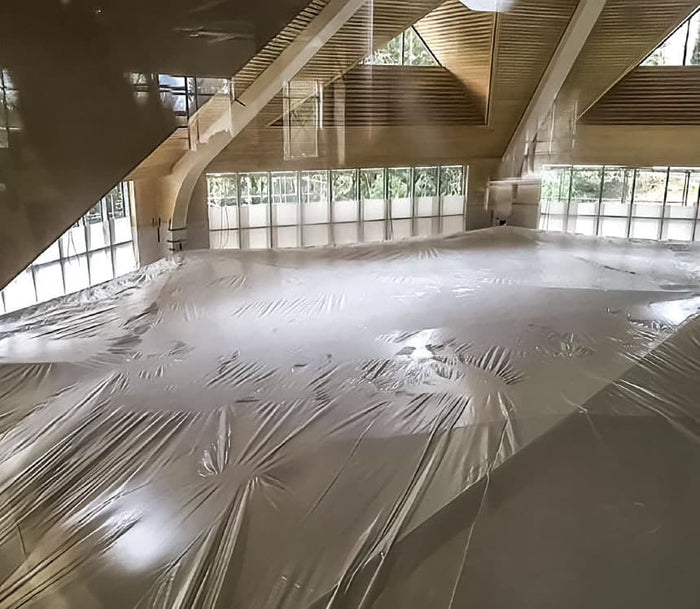
Temporary ceiling dust barrier
CATEGORY Shrink Wrap Partitions ABOUT THIS PROJECT With a team of 5 employees working over the course of 1 weekend, Rhino have completed the installation of a 600 square metre temporary ceiling dust barrier in Louth, UK. Lincolnshire based Gelder Group, who employ over 300 people in the UK, contacted Rhino to construct a temporary suspended ceiling dust barrier in order to completely contain the dust generated during the construction of a new spa complex at the Kenwick Park Hotel. Because the building which houses the spa and pool area had been mostly completed, there was a potential issue whereby continuing construction work would create dust that would eventually require extensive high level cleaning of wooden pannelling and other finished surfaces. In most cases where large dust and debris containment sheeting is used to create temporary partitions in factories and retail environments, we fix the sheets to a scaffolding structure. For this project, scaffolding was not required for access purposes, and to set up a temporary scaffolding just for the purposes of supporting the dust control sheeting would have been time consuming and costly. Instead, Rhino proposed a support structure based around tensioned strapping. With anchor points pre-fixed into the walls by the main contractor, the shrink wrap installation team from Rhino, used access towers to install 20 tensioned straps which radiated from around the building to a central ring. Finally a ratchet strap was attached to the central ring from above and tensioned to create a cone effect. With the tensioned strapping support structure in place, the Rhino team used a 12 metre wide, 200 micro thick, flame retardant shrink wrap sheet to create the temporary construction ceiling. Overlaps between sheets were heat welded to create a continuously sealed skin. Around the edge of the building, temporary corrugated plastic panels were fixed to the walls and a skirt was installed between the roof sheeting and the wall. In this way, any dust from the construction work below could be completely contained. At some point in the future, (hopefully soon), when the Covid 19 screens are no longer required, it will be easy to to cut down the shrink wrap in sections using a Stanley knife and fold it for recycling before removing the batten and track. (All Rhino Shrink Wrap sheeting products are 100% recyclable.) If graphics or signage is required, it is easy to apply self adhesive vinyl signage and zipped access hatches can ensure emergency exit routes remain accessible. Compared to other Covid 19 barriers, such as solid hoarding, a shrink wrap screen offers more flexibility with regard to installation. Our standard product is available in sheets up to 7m wide x 15m long, and where joins are required, the sheets are heat welded so there is no limit to the size and shape of area that can be covered. As standard, our sheet is supplied in a white colour, but we can supply & install transparent screening also. If you prefer, we can provide ‘materials only’ and guidance to help you install the screens using your in-house teams. For more information about our internal building screens, contact our friendly team on 01477 532222 or e-mail info@rhinoshrinkwrap.com. We look forward to hearing from you.
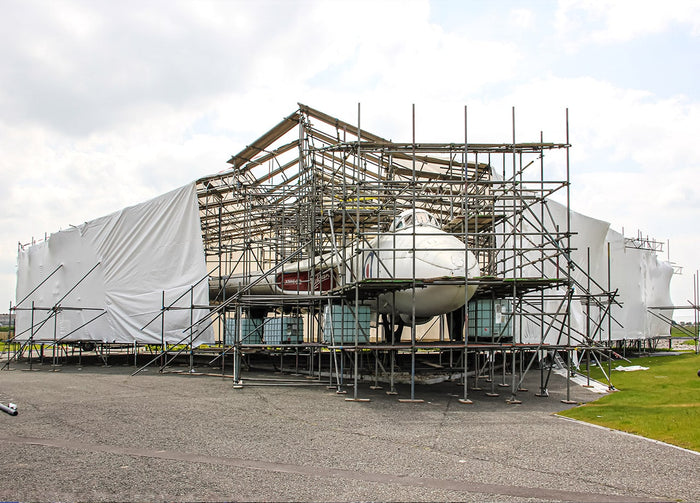
Temporary Shrink Wrap Roof
The Brief When a shrink wrap roof was required to protect an historic Vulcan bomber during restoration work, Rhino Shrink Wrap provided the materials and installation services to help ensure the project could be completed in dry and controlled conditions. The Avro Heritage Museum, which opened in November 2015, is situated on the site of the old Woodford Airfield in Woodford, Greater Manchester. The airfield, which closed in 2011, has a long & illustrious history – 7377 of the famous Second World War Lancaster Bombers were assembled here and Woodford also manufactured the iconic Vulcan Bomber which was operated by the Royal Air Force from 1960 to 1993. Originally developed to deliver Britain’s nuclear deterrent, (crew were on permanent standby to take off in just 2 minutes in the event of a Soviet attack), the Vulcan was a revolutionary aircraft for it’s time and it’s delta winged design and distinctive sound make it an iconic and much loved aircraft. Although 135 Vulcans were built, many were broken up after the Vulcan left active service in the 1990’s. At The Avro heritage Museum, Vulcan XM603 is being restored by a dedicated team of volunteers. Without a hanger, carrying out the repairs and repainting the aircraft even during the summer months would have proved very difficult. The museum contracted Climb It Scaffolding Ltd., also from Manchester to construct a scaffolding around and a temporary roof over the Vulcan and Rhino Shrink Wrap were contracted to completely encapsulate the roof and sides of the scaffolding structure to provide a dry and controlled environment for the work to take place. The Structure A temporary shrink wrap roof is nearly always a challenge and so we worked closely with Climb It Scaffolding during the erection of the scaffold structure. Whilst small temporary roofs can be boarded out completely, this is not usually practical for large roofs so our minimum requirement for a temporary shrink wrap roof is that a run of boards (3 boards wide) is laid around the perimeter / edge of the roof. In addition, runs of boards (3 boards wide) are laid over the roof, in line with the pitch and at centres of 2 metres maximum. Finally, a handrail is erected around the perimeter of the roof to provide edge protection and to allow the installation team to install their own safety lines. (We use equipment from Spanset, including the ‘Gotcha’ rescue kit in which our teams are trained in using.) The Process Our teams started by hanging the scaffolding shrink wrap around the sides of the structure. The side sheeting is overlapped on to the top edge of the roof and ‘tacked’ into position using small wooden battens. For this project, the height of the scaffolding was only 2-3 lifts (4-6m or 13-20’) which meant that the entire ‘drop’ of the scaffold structure could be covered in a one sheet. If the scaffolding had been more than 3 lifts high then it is normal practice to fix the shrink wrap to the scaffolding every 6m vertical height and begin a new drop. Why start by hanging shrink wrap around the sides of the scaffolding? The main reason is that if the sides are hung first, the shrink wrap sheeting which is used to cover the roof will overlap the sides like a roof tile and joints between sheets should not leak. Hanging the sides also creates a wind break which makes it easier to fix and in particularly heat shrink the roof sheeting drum tight. Next, the roof sheets were rolled out. Individual sheets are overlapped by around 30cm and heat welded together. Around the perimeter of the roof, the roof sheets are heat welded to the top edge of the side sheets. Once the shrink wrap has been fixed around the sides and over the roof of the scaffolding and all sheets have been heat welded / joined together the final part of the process can begin – heat shrinking. The heat shrinking part of the scaffold shrink wrap process involves using a gas shrink wrapping gun to shrink the sheeting ‘drum tight’. the installers try and cover all parts of the sheeting to create a smooth, tight covering that will not flap and detach like traditional scaffold sheeting. The Challenges The main challenge faced in erecting the shrink wrap sheeting over the roof and sides of the scaffolding which covered the Vulcan bomber was the weather. On day 2, when the roof sheets were installed over the starboard wing of the Vulcan it was very wet. Rain is particularly a problem when installation a large temporary shrink wrap roof because a large roof will require that individual sheets of scaffold shrink wrap (which are typically 7m wide x 15m long) will need to be heat welded / sealed together. In wet conditions, it becomes difficult to get a very effective heat welded joint between two sections of scaffold wrap. Although it may appear that the sheets have been bonded, this bond will not be as strong as a weld created in dry conditions. The best way forward is to wait until dry conditions but if this is not practical then it is necessary to try and dry the overlapped area before starting to weld them together. On day 3, the rain had stopped but now the wind speed had increased! The wind can make hanging sheets much slower. For the installation of the largest roof sheets our teams attached heavy duty strapping to the scaffolding and unrolled the roof sheets underneath these straps to keep control of the shrink wrap sheeting. However, the main challenge with wind is that it becomes very difficult to shrink the sheeting ‘drum tight’. Instead of the sheeting, shrinking down and creating a smooth, glossy and tight surface, as the wrap is heated it momentarily becomes very soft and supple and in windy conditions may be blown into a large bubble. In these kind of conditions, it becomes necessary to heat a very small area, let it shrink, heat another area, let it shrink and so on. This technique, often known as ‘spot shrinking’ can work but it is time consuming. For this project our teams returned on the final day, when the winds had dropped to finish the shrinking process, which in the right conditions is the quickest and easiest part of the entire process of creating a temporary shrink wrap roof.
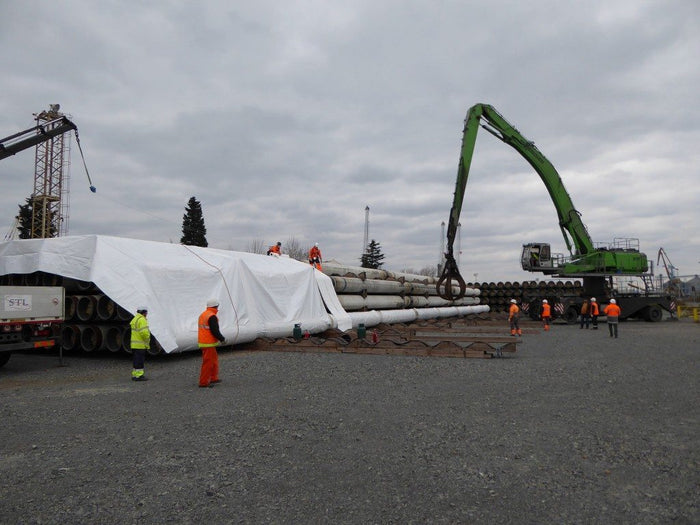
Industrial Covers For Line Pipe
TEMPORARY ROOF FOR LISTED BUILDING IN STAFFORDSHIRE This case study will give you some insights into how the team at Rhino Shrink Wrap specify and install large industrial covers, including a step by step description of the method by which we installed a 1224 square metre (13,175 square feet) shrink wrap cover to encapsulate and protect a large stack of line pipe in December 2015. The Problem In November 2015, we were contacted by South Stream Transport BV who were looking to find the best way of covering stacks of subsea line pipe, that were being stored ashore awaiting installation. South Stream Transport are an offshore pipeline company based in The Netherlands. Working with Gazprom, South Stream are building ‘TurkStream’, a pipeline under the Black Sea that will connect gas reserves in Russia to the Turkish gas distribution network and so provide energy supplies for Turkey and South-East Europe. Although, line pipe is designed to be a rugged product once installed on the sea bed, engineers from South Stream were concerned that pipe coating could be damaged by long term exposure to UV light during storage ashore. Some kind of covering was required but what type? The customer had of course considered using tarpaulins and had even carried out some trials of large tarps but these had not been 100% successful. Tarpaulins of course can be very useful but for this application they were proving bulky and heavy to lift which made them hard to install and some had been blown off by the wind. A traditional tarpaulin type cover with weights We proposed an industrial covering for the line pipes based around our shrink wrap sheeting rather than tarpaulin for this project based on the following advantages: Shrink wrap sheeting ‘versus’ tarpaulins Robust – A shrink wrap cover will be shrunk ‘as tight as a drum skin’ around the line pipe stacks. This means it is much more robust than traditional tarpaulins which can be difficult to fit tightly. This means it will not flap and ‘self destruct’, even in high winds. Heat sealed joints – A shrink wrap covering is easily joined by heat welding two sections of cover together. This process creates a bonded and weather proof joint as strong as the original shrink wrap material and means that there is no limit to the size of area that can be completely encapsulated. Easy to repair – Because of the heat welding / sealing process, a shrink wrap cover is very easy to repair. Simply take a new section of shrink wrap and heat weld over the damaged area. Versatile – Because a shrink wrap cover is cut and heat welded by the installation team at the location it is required, there is no need to order specific sizes of cover in advance for different sized stacks and there is no need to ensure that a specific cover is used on a specific pipe stack. If the line pipe stack layout changes, this can be taken care of easily within the standard product. 100% Recyclable – Traditional tarpaulins can be difficult to recycle because of their composition, which makes the separation of materials problematic. However, a shrink wrap cover is very easy to remove and is completely recyclable. Because the shrink wrap is manufactured from 100% virgin resins, it is valued by re-processing companies. Typical applications for recycled industrial grade shrink wrap film are HDPE piping and agricultural films such as silage or bale wrap. Our Approach We began by asking engineers for drawings and photographs of some typical line pipe stacks. Then, back at our office in the UK we began to consider the project and our proposal for the product and installation process. We considered the following; How will the industrial covers be secured? When we look at a new application for a shrink wrap covering we need to consider how the sheeting will be held down or secured to whatever it is covering. When the cover is properly locked down into position, the heat shrink process will create a taught and ‘drum tight’ covering. For scaffolding encapsulation, the shrink wrap sheeting is simply overlapped around a horizontal tube or ‘ledger’ and heat welded back on to itself. For large industrial covers, such as these huge modules we wrapped for Interserve it may be possible to bring the shrink wrap completely underneath the object so that it is completely encapsulated. The first line pipe stack to cover was 48m (157′) long x 15m (49′) wide x 4m (13′) high – a total area of around 1224 square metres or 13,175 square feet. This was too large to lift and sheeting could not be slid underneath because the pipes were sitting on long wooden ‘bearers’. We considered running a band of strapping down each 48m side of the line pipe stack which we could overlap the shrink wrap around and heat weld back on to itself but at this length it would have been difficult to tension the strapping sufficiently to stop the cover ‘riding up’ around the pipe when the cover was heat shrunk. The solution was to encapsulate the lowest pipe running along the bottom edge of each stack with band of shrink wrap. This would mean that the top cover could be unfolded along the roof and down the side of each stack and could be then simply be heat welded to the lowest shrink wrapped pipe to lock it into position. The additional benefit of this solution is that it is completely ‘self contained’, i.e. it just needs shrink wrap sheeting and no additional tie downs or weights are required which had typically been used to hold down the more traditional tarpaulins during testing. However, the ends of each stack of pipes presented more of a challenge. The customer wanted to leave the ends of the stacks open which meant that we had to find some way of terminating the shrink wrap cover across the 15m (49′) width of the stack at a height of 4m (13′). To achieve this we installed and tensioned woven strapping. When the shrink wrap sheeting was installed, it was wrapped around this strapping and heat welded to itself to provide an anchoring point. What size and grade of shrink wrap sheeting will work best for industrial covers? We stock rolls of shrink wrap sheeting in a variety of widths from 6m to 16m wide and from 190 microns to 500 microns thickness. However, it is not just a matter of choosing the largest roll size possible. For this project we decided to use a 6m (20′) wide x 25m (82′) long roll of our 300 micron (12 mil) shrink wrap sheeting. This roll weighs 43Kg (95lbs), but whilst it is not exactly ‘lightweight’ is is more manageable than a 16m (52′) x 50m (164′) roll which weighs 163Kg (359lbs). A narrower shrink wrap roll width will often tend to have a much better ‘shrink ratio’ and that was important to us on this project because we wanted the covers to shrink down as tightly as possible around the line pipe stack. A tight covering of any kind will be much less likely to move, rub and flap and consequently will be much less likely to come off in strong winds. The 300 micron (12 mil) grade is probably thicker than many might select for industrial covers but because the covers could be in use for up to 2 years we felt that this would provide better protection than say a 190 micron (8 mil) shrink wrap which is often used for shrink wrapping boats and smaller industrial products during transport and storage. Because the customer wished to leave the ends of the line pipe stacks open, we felt there was a risk, during high winds, of the shrink wrap covering being damaged by being pushed up from the inside. As a ‘belt and braces’ approach we decided to fix straps over the shrink wrap covering which could be ratcheted tight and absorb the additional wind loads resulting from having each end of the cover open to the elements. What will be the installation process? A detailed installation process is outlined in ‘The Shrink Wrap Installation Process’ below. However, with every installation project that we are involved in, it is vital that we can develop and document a safe system of work. With the exception of harnesses, we exclusively use safety equipment manufactured by Spanset in the United Kingdom. For this project in particular we used the Spanset Lightweight Fall Arrestor and the Spanset Recovery Block. The Recovery Block with a 15m line was secured to an overhead crane and used for the installation of the strapping. Once these straps were installed, our installers switched to the Lightweight fall arrestor which has a 3m line under constant tension. The Rhino Shrink Wrap Installation Team carry all necessary certification for the safe installation of industrial grade shrink wrap covers including; Site Supervisor Certification (SSSTS) International Powered Access Federation (IPAF) Pre-fabricated Access Suppliers & Manufacturers Association (PASMA), ‘GOTCHA’ rescue training (Spanset) Competent Persons Inspection (Spanset) Working At Height (Spanset) Emergency First Aid at Work Fire Marshall Certification Construction Skills Certification Scheme (CSCS) Shrink Wrap Industrial Covers for Line Pipe – The Installation Process Shrink Wrap Process – DAY1 The time scale for this project was tight. We needed to get the first stack covered before the Christmas break. As shrink wrapping is always weather dependant on relatively calm winds and dry conditions we were hoping that the weather would be kind to us! We had shipped a pallet / skid of materials in advance which meant that our 2 man team could fly out as soon as the materials landed and the customer gave us the go ahead. For this project, Kris Martin and Tom Mount from Rhino were selected to carry out the work. Both Kris and Tom have many years experience shrink wrapping scaffolds and general industrial products. After their four hour flight, they picked up their rental car and headed directly to the customer’s site to complete the induction, security checks and get site passes issued in order to get a rapid start to work the following morning. First, the customer wanted to verify that the coating of the line pipe would not be damaged by the heat shrink process so we were requested to undertake a test on a scrap piece of pipe before the full scale covering. The customer first placed temperature indicating strips around the pipe, in locations where the shrink wrap cover would be shrunk and also in locations where the shrink wrap sheeting would be welded together. Once the sheeting was installed, the covering was cut open to reveal that virtually no heat had been transferred through to the coating of the pipe during the shrink wrap process and we were given the all clear to continue with the work. Installing shrink wrap sheeting around bottom pipe Shrink Wrap Process – DAY2 Encapsulate bottom pipe to act as anchor point for cover To begin, the bottom line pipe is encapsulated using a 3m wide strip of Rhino 300 micron shrink wrap film, along the entire 48m length of the bottom pipe on each side of the stack of line pipes. Install woven strapping at pipe ends to act as anchor point for cover Next, woven strapping (3.5 ton break strength) is installed to provide a termination point / ‘perimeter band’ for the top cover at each ‘open pipe end’ of the stack. Install first 6m x 25m shrink wrap sheet across stack The first 6m x 25m cover is unrolled to completely cover a 6m wide strip across the 48m long stack. (This first sheet will cover both the roof and the sides of the line pipe stack.) Heat weld first 6m wide strip The first 6m wide sheet is overlapped to the bottom shrink wrapped line pipe by 30-40cm and the two sections of shrink wrap cover heat welded together at ground level. The first 6m wide sheet is also welded around the tensioned strapping / ‘perimeter band’ installed at the open end of the stack. Install first ratchet straps Strapping is installed at 4m intervals up & over the first 7m wide strip and ratcheted tight. The benefit of this approach is that the work can progress in controlled stages. Even if it became windy before all the strips of shrink wrap sheeting had been installed and heat shrunk, the strapping keeps everything under control. The strapping is terminated / secured at either end by passing around a line pipe. (To secure strapping around line pipe it is necessary to make a small hole in the cover – this hole can then be taped or a patch of shrink wrap cover heat welded over the top). Unfolding and installing the first 6m x 25m roll of shrink wrap sheeting 3 x 6m wide strips of shrink wrap sheeting Shrink Wrap Process – DAY3 Install remaining ratchet straps The next 10 runs of strapping are fixed into position. Kris and Tom switch from the 15m long fall arrest blocks to a 3m long lanyard which will attach to the 3.5 ton tensioned straps. Because the strapping is installed at 4m intervals, this means that it is not possible for an operative working on the top surface of the line pipe stack to reach the edge. Work to fix the cover in areas which are within 2m of the edge of the line pipe stack takes place from within a scissor lift. Install next 6m wide sheets of shrink wrap The 2nd and 3rd shrink wrap rolls rolls are unfolded by the two man team across the top of the line pipe stack and pass under the tensioned strapping previously installed. Join 6m wide strips of shrink wrap by heat welding together The 2nd strip of shrink wrap film is overlapped onto the 1st 6m wide strip by 30-40cm and heat welded to bond the sheets together. It is also welded the shrink wrapped bottom pipe. The 3rd strip of shrink wrap is overlapped onto the 2nd strip by 30-40cm and heat welded to bond the sheets together. It is also welded the shrink wrapped bottom pipe.. Heat shrink cover ‘drum tight’ The 1st 6m wide sheet is now heat shrunk ‘drum tight’ both up the sides and over the roof of the stack. The process is repeated in 6m wide strips until the entire stack has been covered and heat shrunk tight. Shrinking the cover ‘drum tight’ Heat welding overlapping sheets together Heat shrink cover ‘drum tight’ The 1st 6m wide sheet is now heat shrunk ‘drum tight’ both up the sides and over the roof of the stack. The process is repeated in 6m wide strips until the entire stack has been covered and heat shrunk tight. The 1st 6m wide sheet is now heat shrunk ‘drum tight’ both up the sides and over the roof of the stack. The process is repeated in 6m wide strips until the entire stack has been covered and heat shrunk tight. Shrink Wrap Process – DAY4 Install self adhesive weather proof vents The final stage of the process was to install some self adhesive weather proof air vents. These vents allow a cross flow of air beneath the covering and also allow wind that enters the open ends of the stacks to be vented without damaging the cover. For this project we installed one air vent every 25 square metres, both over the top and along the sides of the line pipe stacks. The finished cover Shrink wrap cover after snow Industrial Covers – Challenges Weather – On these large shrink wrap projects that require the work to be carried outside, the weather can be problematic. Light winds are require to shrink the sheeting ‘drum tight’ and where sheets of shrink wrap needed to be heat welded together, this can be difficult if sheets are wet. On this project, it snowed shortly after completion and this put extra pressure on the shrink wrap sheeting where it passed around the top corners of the line pipe stack, causing some splits to appear. It was subsequently decided that we would install a reinforcing patch on the shrink wrap cover in these vulnerable areas and that we would also improve the method of attaching the strapping / perimeter band at the open ends of the stacks. We manufactured a small but robust clamp which we fixed to the bottom row of open line pipe ends (and down each 4m high edge of the stack) at 2 metre intervals. When we passed the strapping through these clamp points it proved to be a much improved method for anchoring the shrink wrap sheeting at the ‘tricky’ pipe ends. Clamps used to hold strapping at open pipe ends of stack At Rhino we don’t automatically assume that a shrink wrap cover is right for everybody or every application. However, if you have found this case study useful and you would like to find out more please call or email us today and one of our friendly and knowledgable team will be happy to help.