Case Studies
Explore real-world examples of Rhino Shrink Wrap® in action.
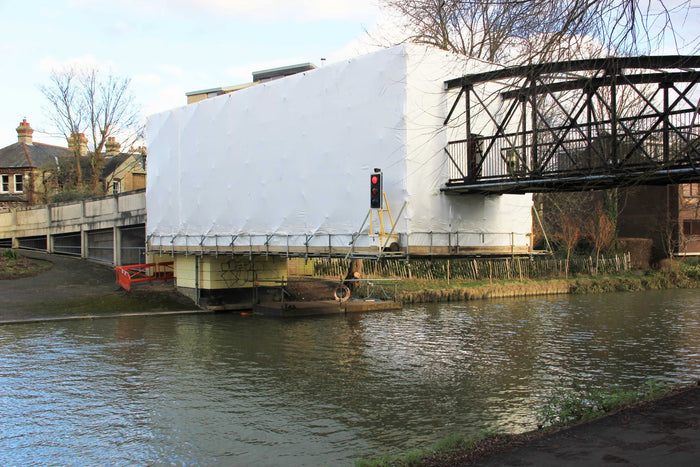
Scaffold Encapsulation - Cambridge
The Brief Rhino Shrink Wrap were approached by TrueForm Scaffolding Ltd. to provide full encapsulation of a scaffolding over a bridge spanning the Lower River in Cambridge, UK. The entire structure of the footbridge required shot blasting and painting. Due to weigh restrictions on the bridge, the project was planned so that half of the footbridge would be scaffolded and shrink wrapped in two phases. We used our signature 300 micron scaffold shrink wrap film for this project. This wrap, which is flame retardant to the EN13501 standard and is supplied as a 7m wide x 15m long roll. Shrink wrap sheeting is particularly advantageous for shot blasting and painting applications because joints between individual sheets of shrink wrap are heat welded using a propane gas hot air gun to create a continuously bonded skin over & around the scaffolding structure. This seal makes creating environmental containment much easier whilst the ‘drum tight’ fit means that the shrink wrap sheeting does not tend to flap and self destruct like traditional sheeting products. This means the sheeting can be relied on to provide weather protection and temperature control during the painting phase of the project without requiring frequent maintenance visits. The Scaffold Encapsulation Process The Rhino installation team step began by hanging the shrink wrap sheeting around the side elevations of the scaffolding. This sheeting was battened around the perimeter of the roof and dropped 30-40cm past the lowest hand rail. The shrink film was wrapped around the hand rail and heat welded back on to itself to provide a lower anchor point for the sheeting. Where possible, joins between sheets were planned to occur at the point where protrusions, (such as the bridge structure) passed through the shrink wrap to minimise the amount of cutting and resealing required. The shrink wrap roof sheet was then fitted and overlapped and welded to the side sheets. Once the main part of the structure had been covered and heat shrunk drum tight the Rhino team were able to move on to creating the ‘final seal’. TrueForm scaffolding provided a boarded platform suspended beneath the footbridge. Rhino laid the shrink wrap sheeting over the boards and heat welded this floor sheet to the side sheets previously installed. TrueForm then laid another floor of scaffold boards on top of the shrink wrap so that the sheeting was protected. The final stage was to install a zipped access door which allowed workers to access the blasting and painting area whilst full encapsulation was maintained around the project. Key Challenges Cutting around the bridge structure whilst maintaining a seal for shot blasting work. Working around the weather. In the middle of installation, when a large storm was forecast, our teams went in early to complete the work and keep the project on schedule. Lessons Although a fairly small project, the success of this project was due in large part to TrueForm Scaffolding. By building the scaffolding structure flush and by provided a fully boarded floor and roof, our installers were able to easily install the shrink wrap sheeting and achieve full encapsulation ready for the shot blasting and painting teams.
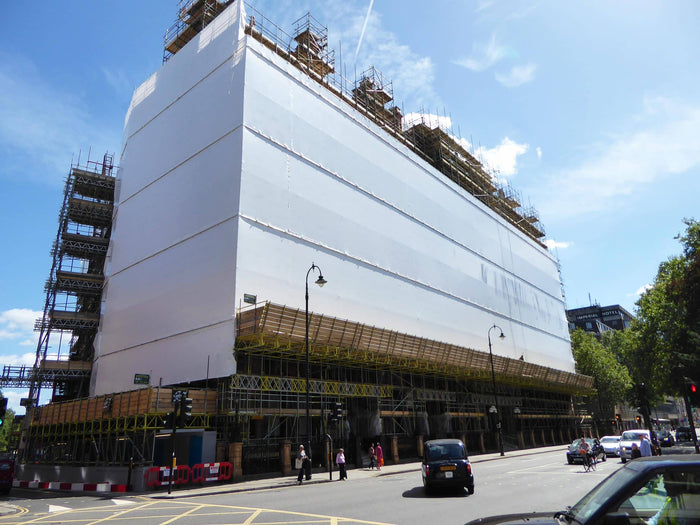
Russell Square London
The Brief The spectacular Hotel Russell, situated on Russell Square in the heart of London was built in 1898 by the architect Charles Fitzroy Doll and was one of the first hotels in London to feature an innovative feature for it’s day – en-suite bathrooms! The hotel has some interesting historical links to the Titanic – the restaurant in this hotel is said to be almost identical to the one on the Titanic, which the architect also designed. Owned by the Principal Hayley Group, in the summer of 2016 a complete refurbishment of the hotel by S&T Interiors began and Rhino Shrink Wrap were contracted by MR Scaffolding to provide scaffold shrink wrapping to completely encapsulate the scaffolding around all four exterior elevations. Scaffold shrink wrapping was chosen to provide containment for the hydro blasting works, weather protection during the winter months and also to provide a smart & professional appearance to this construction project which will not be finished until 2017. However, scaffold shrink wrap is not the right solution for everybody and every job. Hopefully this example project will highlight why other scaffolders and contractors have used shrink wrap sheeting and help you advise your customers if shrink wrap sheeting will benefit them on their next project. What is scaffold shrink wrap? Scaffold shrink wrap is a type scaffold sheeting which is made from a low density polythene that has been engineered so that when heated, it is shrinks powerfully and moulds tightly (but does not stick to) whatever it covers. Scaffold shrink wrapping is also designed so that it can be heat welded together in such a way that any joints between sheets are strong and permanent. Because there is no limit to the number of sheets that can be welded together, there is no limit to the size of the project that can be shrink wrapped. The most common size of scaffold shrink wrap used is a 1.8m wide roll (which weighs 32Kg / 70lbs) which unfolds to a sheet that is 7m wide (23’) x 15m (50’) long. Because it is 7m wide, this means that it is normally used to cover up to three lifts of scaffolding, or around 6m (18’). However, the size of the ‘drop’ will change according to the job. For an indoor scaffolds, such as might be used for a factory partition, there is no limit to the drop, whilst for a very exposed outdoor job, it might be better to drop the sheeting less than 6m before tying it back to the scaffolding. A shrink wrap used for scaffold wrapping should be around 300 microns thick, which is sometimes referred to as 12 mil in the USA. Again, 300 microns or 12mil has become the standard thickness for scaffold shrink wrap films that are going to be used for weather protection or environmental containment outside. This gives you a wrap that is heavy duty enough to cover a scaffold but still flexible enough that it is still easy to heat weld together. How is shrink wrap different to ‘traditional’ scaffold sheeting? Fundamentally, it is the two unique characteristics of the shrink wrap scaffold sheeting (the heat shrinking and the welded joints between sheets) that make it different to traditional types of scaffold sheeting. For example, once it has been fixed to the scaffolding and heat shrunk, it creates a very tightly fitting sheet which will not flap and self destruct like some types of sheeting. This makes it really strong and robust. The second result is that it is possible to create a completely sealed skin around a construction project without any holes or gaps typical of most sheeting systems. This makes it really good for those projects where the containment of dust and debris or whatever is required. Why was shrink wrap sheeting for scaffolding chosen for the Hotel Russell, London? This construction project is a great example of why scaffolders and contractors choose shrink wrap sheeting. On this job we’re encapsulating all four sides of the scaffolding, which in effect a complete block of London. When finished we will have hung around 7000 square metres or 75,0000 square feet of scaffold shrink wrapping. So, why is shrink wrap sheeting being used on this project? Firstly, as part of the refurbishment process, the fantastic terracotta exterior of the building is going to be water blasted and as this site is located in a very busy part of London, it’s important to completely contain the water and dirt that is going to be created as the building is cleaned. Traditional scaffold sheeting, which has gaps between overlapping sheets, would not be particularly effective at containing the dirty water and spray. Also, as a fairly long term and high profile construction project, there is a need for the scaffold sheeting to look smart and professional over many months, whatever the weather is going to throw at it. A good quality shrink wrap will have a very high yield strength which in effect means that it has elasticity and it can ‘bounce back’ to it’s original taught & tight state. Unlike traditional scaffold sheeting, there are no elasticated bungees tying this sheeting to the scaffolding which can stretch over time and cause the sheeting to become baggy. Instead the sheeting is wrapped around a scaffolding sheet and heat welded back on to itself. So, in summary, scaffold shrink wrapping was chosen by the scaffolder and contractor on this project because; They required a sheeting that will not detach. Shrink wrap is often used for projects where the sheeting detaching would cause problems. They need to create a completely ‘completely sealed skin’ around the building to provide the best containment of dust and debris. They needed a sheeting that looks smart & professional and will keep looking smart & professional for up to 12 months. Shrink Wrapping of The Hotel Russell – The Challenges With traditional style scaffold sheeting products, which are generally installed on a ‘lift by lift’ basis around the scaffolding, protruding transoms, ledgers and standards do not cause much of an issue for the installation of sheeting, because the scaffold tubes stick through the sheeting at the point the strips of scaffold sheeting overlap. For shrink wrap scaffold sheeting, which is normally supplied on a roll which opens out to 7 metre wide sheet, having to cut around protruding tubes, whilst not impossible, can affect both the appearance and performance of the finished job. System scaffolds are the easiest to shrink wrap but in the UK at least, these are still the minority of scaffolds on which we work day to day. As the appearance of the sheeting was considered to be of great importance to this project, the team at Rhino worked closely with the team at MR Scaffolding, and it was decided to install sheeting rails on the outside of the scaffolding structure which would hold the sheeting away from the scaffold fittings. Planning a scaffold structure for shrink wrapping? Key points to remember are; Keep the scaffold structure flush Ensure the scaffold is fully boarded to create safe access to all parts of the scaffold structure that require sheeting For a really great looking job, install a ‘sheeting rail’, mounted on a single, around the scaffolding lift by lift, this will hold the sheeting off scaffold fittings and prevent any sharp bolts sticking through the sheeting.
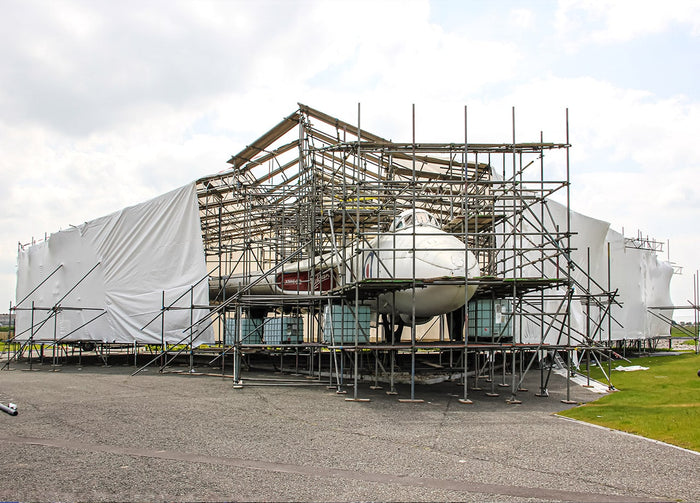
Temporary Shrink Wrap Roof
The Brief When a shrink wrap roof was required to protect an historic Vulcan bomber during restoration work, Rhino Shrink Wrap provided the materials and installation services to help ensure the project could be completed in dry and controlled conditions. The Avro Heritage Museum, which opened in November 2015, is situated on the site of the old Woodford Airfield in Woodford, Greater Manchester. The airfield, which closed in 2011, has a long & illustrious history – 7377 of the famous Second World War Lancaster Bombers were assembled here and Woodford also manufactured the iconic Vulcan Bomber which was operated by the Royal Air Force from 1960 to 1993. Originally developed to deliver Britain’s nuclear deterrent, (crew were on permanent standby to take off in just 2 minutes in the event of a Soviet attack), the Vulcan was a revolutionary aircraft for it’s time and it’s delta winged design and distinctive sound make it an iconic and much loved aircraft. Although 135 Vulcans were built, many were broken up after the Vulcan left active service in the 1990’s. At The Avro heritage Museum, Vulcan XM603 is being restored by a dedicated team of volunteers. Without a hanger, carrying out the repairs and repainting the aircraft even during the summer months would have proved very difficult. The museum contracted Climb It Scaffolding Ltd., also from Manchester to construct a scaffolding around and a temporary roof over the Vulcan and Rhino Shrink Wrap were contracted to completely encapsulate the roof and sides of the scaffolding structure to provide a dry and controlled environment for the work to take place. The Structure A temporary shrink wrap roof is nearly always a challenge and so we worked closely with Climb It Scaffolding during the erection of the scaffold structure. Whilst small temporary roofs can be boarded out completely, this is not usually practical for large roofs so our minimum requirement for a temporary shrink wrap roof is that a run of boards (3 boards wide) is laid around the perimeter / edge of the roof. In addition, runs of boards (3 boards wide) are laid over the roof, in line with the pitch and at centres of 2 metres maximum. Finally, a handrail is erected around the perimeter of the roof to provide edge protection and to allow the installation team to install their own safety lines. (We use equipment from Spanset, including the ‘Gotcha’ rescue kit in which our teams are trained in using.) The Process Our teams started by hanging the scaffolding shrink wrap around the sides of the structure. The side sheeting is overlapped on to the top edge of the roof and ‘tacked’ into position using small wooden battens. For this project, the height of the scaffolding was only 2-3 lifts (4-6m or 13-20’) which meant that the entire ‘drop’ of the scaffold structure could be covered in a one sheet. If the scaffolding had been more than 3 lifts high then it is normal practice to fix the shrink wrap to the scaffolding every 6m vertical height and begin a new drop. Why start by hanging shrink wrap around the sides of the scaffolding? The main reason is that if the sides are hung first, the shrink wrap sheeting which is used to cover the roof will overlap the sides like a roof tile and joints between sheets should not leak. Hanging the sides also creates a wind break which makes it easier to fix and in particularly heat shrink the roof sheeting drum tight. Next, the roof sheets were rolled out. Individual sheets are overlapped by around 30cm and heat welded together. Around the perimeter of the roof, the roof sheets are heat welded to the top edge of the side sheets. Once the shrink wrap has been fixed around the sides and over the roof of the scaffolding and all sheets have been heat welded / joined together the final part of the process can begin – heat shrinking. The heat shrinking part of the scaffold shrink wrap process involves using a gas shrink wrapping gun to shrink the sheeting ‘drum tight’. the installers try and cover all parts of the sheeting to create a smooth, tight covering that will not flap and detach like traditional scaffold sheeting. The Challenges The main challenge faced in erecting the shrink wrap sheeting over the roof and sides of the scaffolding which covered the Vulcan bomber was the weather. On day 2, when the roof sheets were installed over the starboard wing of the Vulcan it was very wet. Rain is particularly a problem when installation a large temporary shrink wrap roof because a large roof will require that individual sheets of scaffold shrink wrap (which are typically 7m wide x 15m long) will need to be heat welded / sealed together. In wet conditions, it becomes difficult to get a very effective heat welded joint between two sections of scaffold wrap. Although it may appear that the sheets have been bonded, this bond will not be as strong as a weld created in dry conditions. The best way forward is to wait until dry conditions but if this is not practical then it is necessary to try and dry the overlapped area before starting to weld them together. On day 3, the rain had stopped but now the wind speed had increased! The wind can make hanging sheets much slower. For the installation of the largest roof sheets our teams attached heavy duty strapping to the scaffolding and unrolled the roof sheets underneath these straps to keep control of the shrink wrap sheeting. However, the main challenge with wind is that it becomes very difficult to shrink the sheeting ‘drum tight’. Instead of the sheeting, shrinking down and creating a smooth, glossy and tight surface, as the wrap is heated it momentarily becomes very soft and supple and in windy conditions may be blown into a large bubble. In these kind of conditions, it becomes necessary to heat a very small area, let it shrink, heat another area, let it shrink and so on. This technique, often known as ‘spot shrinking’ can work but it is time consuming. For this project our teams returned on the final day, when the winds had dropped to finish the shrinking process, which in the right conditions is the quickest and easiest part of the entire process of creating a temporary shrink wrap roof.
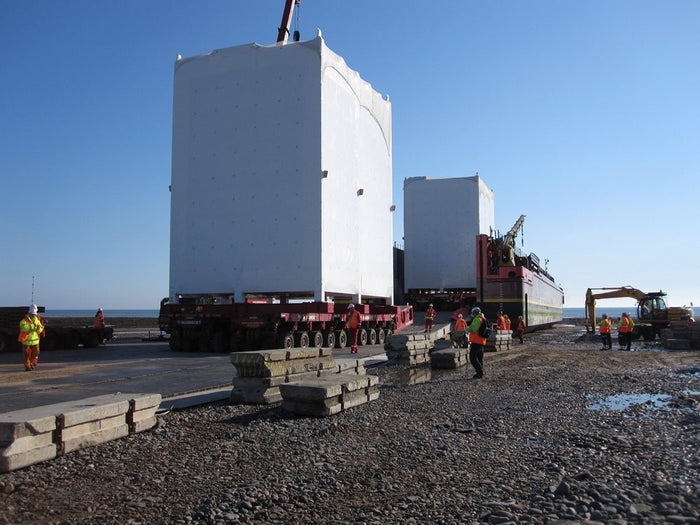
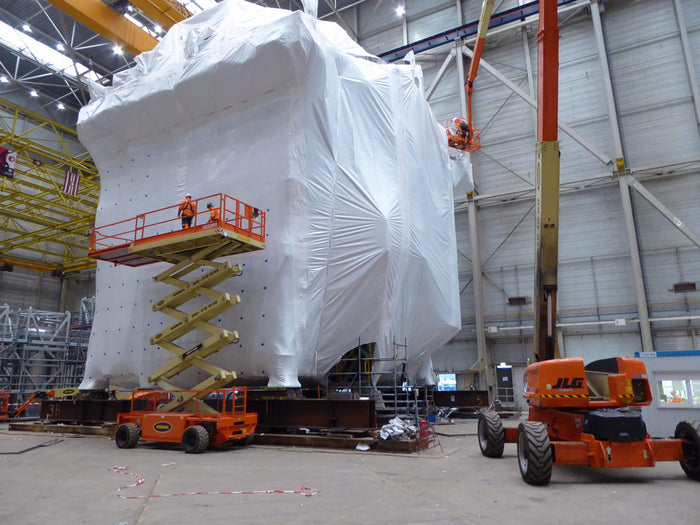
Shrink Wrapped Modules – Sellafield
CATEGORY Industrial Covers ABOUT THIS PROJECT Shrink Wrapped Modules – Sellafield The Evaporator D project at Sellafield is currently the largest nuclear project in the United Kingdom. The ‘Evap D’ facility, once completed in 2016, will treat liquid radioactive waste so that it can be vitrified ready for disposal. Essentially Evap D acts like a giant kettle, reducing the volume of liquid nuclear waste before it is turned into glass and stored. The £300 million contract for the construction of the Evap D facility was awarded to Costain who used innovative off site construction techniques to pre fabricate the facility as 11 huge ‘modules’ at a specially adapted 5 acre factory site near Ellesmere Port in the North West of England. This was the first use of modular construction for a process plant at the Sellafield site. The construction of the eleven Evap D modules represented a complex engineering challenge. The largest of the modules, ‘Module 920’ weighs 525 tonnes and is 27 metres long, 7 metres wide and 12 metres high. In Module 920 alone there is over 5000 metres of high integrity stainless steel pipework constructed to the most exacting nuclear industry standards. The project logistics provided an additional challenge. How could such huge modules be completely protected against weather damage during the 65 mile journey by road & sea from the manufacturing facility to the construction site? Any salt water entering the modules and into the many stainless steel pipes & welds that the modules contained could have serious implications for the future safe operation of the nuclear facility and delay this high profile construction project for many months. Therefore, a temporary sheeting solution was needed that guaranteed, whatever weather conditions were experienced, it would not fail. Shrink Wrap Covers After months of tests, including some on site demonstrations of the industrial shrink wrap process, Costain and construction partners Interserve chose a shrink wrap covering as their preferred transport protection solution. However, as the Evap D modules did not have any solid sides, there was concern that, even after heat shrinking tightly, high winds could push the shrink wrap into large ‘voids’ behind the sheeting and cause damage. The customer suggested something never tried before which was to cover the entire Evap D module in a HDPE plastic mesh to form a ‘support structure’ beneath the shrink wrap. A geotechnical mesh product that had been designed for installing underground to stabilise soil was hung around the module and secured to the module using a woven strapping. Next, working from the outside, using ‘cherry pickers’, 12 metre wide sheets of 300 micron thick shrink wrap sheeting were hung and heat welded together before being shrunk ‘drum tight’. The final step, to make the shrink wrap cover ‘bomb proof’, and to provide the 100% guaranteed weatherproof protection that this project required from the temporary sheeting was to make a small hole in the shrink wrap sheeting every 1 square metre and pass a velcro tie through the shrink wrap and around the mesh. (The hole was later taped to maintain a weatherproof seal). It was felt, that with the shrink wrap shrunk tight AND tied back to the supporting mesh every 1 square metre this was the most robust solution that could be designed. Project benefits from shrink wrap Heat shrunk ‘drum tight’ – very resistant to damage from high winds. Heat sealed joints between sheets created a completely weather tight, full encapsulation of each module. Smart & professional appearance for a high profile project. Easy to remove in sections at the construction site & 100% recyclable. Lessons Learnt The final module was delivered from Ellesmere Port to Sellafield by specialist barge ‘Terra Marique’ in September 2013. After shrink wrapping 11 modules, over a 2 year period, the weather proofing of the giant modules using shrink wrap sheeting was a 100% success, with no sheeting failures or water ingress. You can find further information on the Evaporator D Project here; http://www.sellafieldsites.com/toobigforroad/ http://www.bbc.co.uk/news/uk-england-cumbria-24345924
Large Custom Transport Cover - Amsterdam
The Brief In December 2015, we were contacted by an offshore oil & gas manufacturer in The Netherlands. They were looking for a large custom transport cover for a huge piece of equipment to protect it during a 12,500 nautical mile journey from Rotterdam in The Netherlands to Okpo in South Korea. At 19m (62′) long x 17m (56′) wide x 20m (66′) high, the module was too large to be completely enclosed within the hold of any transport ship and so for around 52 days at sea it would be exposed to the elements it as it passed down through the North Atlantic and across the Indian Ocean. We demonstrated the shrink wrap encapsulation concept to the customer by travelling to Rotterdam in January 2016 and shrink wrapping a scaffold tower. Following this test, Rhino Shrink Wrap were awarded the contract to provide the materials, equipment and labour to completely encapsulate the module on site in The Netherlands in March 2016. How Do We Make Sure This Custom Transport Cover Will Not Blow Off? Our key concern for a large custom transport cover project such as this is to make sure that it will withstand the toughest of weather conditions without flapping and detaching. We start by considering the wind loads that might reasonably be expected. A Force 10 ‘storm force’ wind of 48-55 knots (55-63 mph) will exert a force of 0.77kN/m2 on to the shrink wrap sheeting. If we look at the module in terms of a 6 sided cube, these sides range in size from 340m2 (3660 square feet) to 380m2 (4090 square feet). This means the wind load on the shrink wrap sheeting on just a single side of the module would be around 300 kN which is equivalent to 30 ton-force during a Force 10 wind. To mitigate these risks we start off by using our 300 micron (12 mil) flame retardant shrink wrap sheeting. This grade of industrial grade shrink wrap sheeting is often used for the encapsulation of large scaffolding structures and it has been specifically engineered to have a high tensile strength at yield This means that not only will it withstand highland loads but it has the elasticity to ‘rebound’ and stay tight and taught. With low quality shrink wrap grades, it may withstand some initial wind loading but it becomes loose and baggy which then causes it to flap and eventually ‘self destruct’. However, on this module there were areas or ‘voids’ where the sheeting would have minimal support from the structure of the module itself which would put further loadings on the sheeting. To mitigate this risk even further we decided to install a tough plastic mesh around the sides, underneath and over the roof of the module. This mesh was tied back to the main structure of the module and provided support to the shrink wrap sheeting. However, the main benefit of using the mesh is that after we have installed the shrink wrap sheeting and heat shrunk it ‘drum tight’ around the module, we can then install a velcro tie through the shrink wrap sheeting and around the mesh which sits underneath. We installed such ties every 1 square metre over the entire module and it means that not only is the shrink wrap supported against wind forces which push against it but where strong winds pass across the sheeting and create suction / lift, the sheeting remains firmly fixed in place. This mesh and shrink wrap technique is fairly time consuming to install and it is certainly not something we would suggest for every situation where a large custom transport cover is required. However, for those situations where ‘failure is not an option’ we have found it to be highly effective. The Shrink Wrap Cover Installation Process Padding Out - We started by using foam which was cut to size and securely fixed via Rhino Patch Tape to pad sharp edges or surfaces of the module where mesh / sheeting / strapping may contact the module structure. Installation of Roof Straps - Next, following our customer pre-approved plan, using MEWPS (cherry picker) the roof straps were laid out. Anchor points for strapping were located and padding pre-installed. Once all straps were positioned they were tensioned to produce the correct roof structure and falls to allow rainwater to drain freely. Installation of Shrink Wrap Mesh - The 4m wide rolls of mesh were unrolled at ground level and cut to the required size using wire snips. Using scissor lifts and cherry pickers, the pre cut sections of mesh were positioned and secured to the module with woven strapping. This was repeated until all 6 faces of module were covered with individual mesh sections. installation of Shrink Wrap Sheeting - Assisted by MEWPS, the shrink wrap sheeting (Rhino 7m wide x 15m long, 300 micron, flame retardant) was placed around the module in the required position (unfolded). Sheet is then cut from roll to required size. Unfold sheet to required width. Trim sheet to required size where necessary. Individual sheets of shrink wrap were joined / sealed together by overlapping them (30-40cm overlap) and using a heat weld process. Where welds run horizontally, we ensured that the higher sheet of shrink wrap overlapped the lower sheet on the outside of the module in the manner of roof tiles. If a good quality shrink wrap sheeting is used, it is not usually required to tape the heat welded joints between sheets but for a project such as this we taped all welds on external / internal faces using Rhino 100mm wide patch tape. The final stage of the shrink wrap installation process is to use our propane gas hot air tools to heat shrink the sheeting ‘drum tight’ over the entire surface of module using propane to create a smooth and tight finish. Installation of Velcro Ties Finally we installed a 100mm x 100mm (approx.) reinforcing tape patch every one square metre. We then cut two slits (approx. 50mm long and 40mm apart vertical distance) through reinforced patch and external shrink wrap covering every one square metre. A Velcro tie was installed through the wrap, around one square of mesh (two plastic strips) and back through wrap, and then the Velcro was joined together on the outside. Once all ties were installed, the area was covered with a 100mm x 100mm (approx.) white tape ‘patch’ to create a weather proof seal. Large Custom Transport Cover – The Challenges The installation of the shrink wrap transport packaging is by definition one of the very last steps on a complex industrial construction project like this. It is much easier to install a transportation cover when the team have exclusive access. However, with a hard deadline approaching such as the sailing date of the transportation vessel, there is the inevitable rush of last minute work and modifications to the module which can sometimes conflict with the needs of the cover installation team. This last minute work could mean our installation team not being able to access a certain parts of the module whilst tests are being carried out or might even be asked to remove parts of the shrink wrap cover to allow equipment to be craned onto the module. Whilst this is frustrating for the installation team, a shrink wrap cover offers much more flexibility in this regard than say a custom tarpaulin cover would. This is because the shrink wrap cover can be cut open and then resealed by welding a patch over the damaged area. We did this in a number of areas and on a number of occaisions. The shrink wrap installation team were able to be very flexible. When faced with the ‘congestion’ of other trades on or around the module during the day, our guys switched to working night shirts for a few days so that they could still make some progress. On this project, the roof proved to be a particular challenge. It was a highly complex part of the module with many vessels, pipes, valves and structural elements at varying heights and positions. We initially considered installing a scaffolding or wooden frame-work to provide a structure to which we could shrink wrap but rejected this idea in favour of a tensioned strapping system which was used both underneath the covering and over the top of the finished shrink wrap cover. This enabled us to create the lowest ‘profile’ roof structure which ran as close as possible to the structure of the module. Working on the roof required use of large cherry pickers, scissor lifts and a man basket which was hung from the overhead factory crane.

Queen Elizabeth Olympic Park
The Brief In January 2014 Balfour Beatty announced they had been awarded a £154m contract by London Legacy to transform the former Queen Elizabeth Olympic Stadium at Queen Elizabeth Olympic Park in London into a ‘multi use venue’ which after hosting five matches for the Rugby World Cup in 2015 will become the full time home for West Ham United in 2016. Part of this project involved a £41m reconfiguration and expansion of the stadium roof. This work, once complete, will increase the roof weight from 1400 tonnes to 4000 tonnes and create the largest cantilevered roof in the world. The project to reconfigure the roof presented a number of challenges. Firstly, work needed to take place on the original stadium roof’s support structure which was up to 37 metres (121 feet) above the ground. Secondly, a time schedule of 25 weeks to complete the works meant that traditional scaffolding techniques would be impractical. As a solution, rather than build from the ‘bottom up’, the scaffolding & access contractor, PHD Modular Access Ltd., implemented techniques usually used in the oil and gas industry and suspended the scaffolding structure from chains hung around the existing roof structure to build the access ‘top down’. The top down approach proved highly successful and in phase 1&2 of the project PHD Modular Access erected 480 tons of Layher Allround® lightweight scaffolding to create 168 ’workshops in the sky’ where shot blasting, welding and painting work was required to take place. Shrink Wrap Encapsulation & Containment Rhino Shrink Wrap were approached by PHD Modular Access to provide weather proofing and environmental containment around each ‘pod’ or ‘workshop’. Traditional scaffold sheeting, applied around the scaffolding in 2m high strips and attached with bungee cords, has gaps between sheets that make it difficult to stop shot blast residues escaping and rainwater penetrating. Furthermore, traditional reinforced sheeting can be difficult to fit tightly which can lead to flapping and ultimately detachment. Rhino proposed using a 300 micron thick Verisafe® flame retardant shrink wrap sheeting which once installed would created a continuously bonded and ‘drum tight’ skin around each pod. The shrink wrap encapsulation of each pod or workshop had two key objectives. Firstly to provide ‘environmental containment’ of shot blast and paint residues as sections of the roof support structure were shot blasted back to bare metal. Secondly, the shrink wrapped ‘pods’ would provide a completely weather proof area where new roof fixings could be welded into place. Zipped access doors installed in the shrink wrap cover each pod allowed welding and painting to take place in a controlled, almost ‘factory like’ environment. Rhino Shrink Wrap supplied 6 installers to carry out the work, split into two teams, each team led by a supervisor. Working from the inside of the platform, the shrink wrap sheeting, (supplied as a 7m wide x 15m long roll), was pulled over the module and battened at ‘ground level’ to a plywood floor laid inside the pod. Excess shrink wrap was trimmed at the corners and any joins or overlaps were heat welded together to create a seal. Finally, the shrink wrap sheeting was heat shrunk ‘drum tight’. Each pod required 100 to 200 square metres of shrink wrap sheeting. The Challenges Welding contractors required new roof components to be welded to the existing roof structure. These needed to be craned into position, inside the sheeted area, after the area had been shot blasted. However, the Rhino team were able to cut an opening in the roof (or on the lower and smaller pods – the sides) to allow the components to be craned through and then seal back up by taping and welding. Working simultaneously on multiple locations within a large construction site was challenging. Our teams met each morning for a briefing so that every team member knew what they were doing and working time was maximised. There were changes in the schedule of work from the client which required us to be highly flexible in our approach. Where necessary our teams worked weekends to meet revised schedules. Lessons The scaffolding and encapsulation of the 168 ‘workshops in the sky’ was finished ahead of schedule. Although a very challenging 3 month project, with much time away from home, our teams learned the importance of effective communication for safety and efficiency on large sites and were proud to play a small part in making this exciting and innovative project a success.
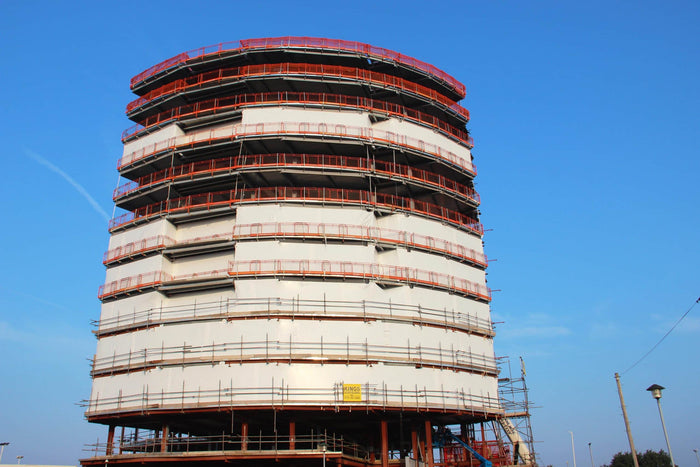
Herculaneum Quay
The Brief Herculaneum Quay is a development of 101 luxury apartments, situated on the bank of the River Mersey. This 15 storey residential tower by Primesites Developments is a significant size construction project for Liverpool. Because the construction site is located right on the banks of the Mersey, it is very exposed to everything the weather can throw at it. As the concrete is poured and floors are added, it will take some time before the permanent rain screen / glazing is installed. The main contractor, COREM, was looking for a temporary solution which would quickly make the building water-tight and enable them to proceed with the internal works in a dry & controlled environment. Temporary High Rise Weather Protection The solution was to use a shrink wrap screen, applied directly to the steel and concrete frame which would wrap the building and provide protection through the winter months. With a ceiling height of around 3m and with the supporting pillars set back from the edge of the concrete slab, Rhino Shrink Wrap were able to make a continuous 150m / 500′ run of shrink wrap around the perimeter of the building on a floor by floor basis. Rhino Shrink Wrap building screens are made from the same materials as our ‘signature’ scaffold wrap. It is an LDPE film that is easily joined by heat welding and which shrinks very powerfully when it is heated – (this is the secret of it’s ‘drum tight’ finish.) As standard, our screens are white in colour and allow almost all daylight through to the interior of the building. Our building wrap has flame retardant additives so that is meets the EN13501 fire retardant specifications and it has Ultra Violet inhibitors so it won’t become brittle when used outside. It is able to be used at a wide range of temperatures – we have used it in projects from Australia to Russia without any problems. Building Screen Installation Process The installation of our shrink wrap building screens is quite straightforward, whether fixing to concrete or steel framed building, the process is the same. The first step is to fix a run of wooden batten to the concrete or steel frame in the position where the shrink wrap screens are required. For a continuous run around the building, (where uprights are set back from the edge of the slab), this batten will be required along the ceiling and floor. Where the building uprights are directly adjacent to the edge of the slab, the shrink wrap will be installed on a ‘bay by bay’ basis and so batten will be required on the uprights also. Once this ‘picture frame’ of wooden batten has been installed, the shrink wrap sheeting is cut to size and hung in position. A second run of wooden batten is used to firmly secure the shrink wrap into position and is screwed firmly into the first batten. If there are no uprights / pillars at corners then the Rhino Shrink Wrap installation team install and tension an industrial grade strapping at the corners around which the shrink film is wrapped. Where a join is required between two sheets, this is achieved by overlapping two sections and using a hot air tool to created a bonded joint between the two sections. The final stage of the process is to use propane gas powered hot air tool to shrink the screens drum tight. This is achieved by passing hot air briefly over the surface of the shrink wrap sheeting. Shrink Wrap & Resistance to Wind Loading One thing that contractors often ask when they start to look at building screens is what wind speeds will they withstand. Now, exact wind speeds will vary from project to project because it depends on the size of the bays and the types of fixings we are using but let me give you an idea. A Force 10 wind, which is a wind speed of 55-63mph or over 100kph will extern a force of 0.77kn/m2. Now a typical bay of a concrete or steel frame building is often in the region of 3.5m high x 6m long which means that in a force 10, there is 17.5kn of Force on that sheet. Well, that is well within the capabilities of our shrink wrap sheeting which has a tensile strength at yield of around 26Kn. This means that sheeting can experience Force 10 winds and bounce back to it’s original taught state. Summary The Rhino Shrink Wrap team installed temporary weather protection around one floor of this high rise concrete and steel frame building each week. For the construction contractor, the ability to start the internal works before the external cladding and glazing is finished has brought a number of benefits – the projects are easier to manage, schedule, and the risk of delays and penalties is reduced. Thank you for taking the time to read this case study. Please do contact us with your questions or comments. We look forward to hearing from you.
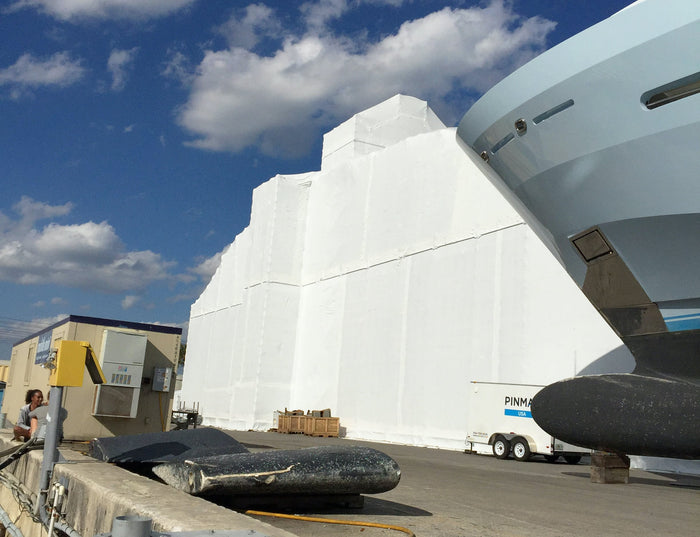
Superyacht Painting Tents
The Brief Shrink wrap sheeting is used in shipyards as a covering for ships and super yachts that are undergoing repair, refit and repainting. A shrink wrap tent allows work to take place in a controlled environment whilst containing dust and overspray from covering vessels located nearby. Paint Shed or Shrink Wrap Painting Tent? In an ideal world, the repainting and refinishing of all ships and superyachts would take place inside a dedicated paint shed. A dedicated building allows for optimum environmental and working conditions. However, it is often not be possible to find a paint shed that is available, or the vessel may may be too large. Even where a dedicated painting facility is available, costs can be high. Over the last decade, scaffolding tents have evolved to overcome some of these limitations with finding dedicated buildings. Once the scaffolding structure has been erected, industrial grade shrink wrap sheeting is used to create a continuously bonded skin around the yacht. The tents are fitted with heaters / air conditioning and powerful extraction systems in order to create the controlled environment required for painting. What are the benefits of shrink wrap yacht tent? Ashore or Afloat – A key benefit of using a shrink wrap tent for yacht painting is that it is possible for the yacht to remain in the water which can save on lifting and slipway / hard standing costs. Robust – A yacht tent may be exposed to high winds. However, because scaffold shrink wrap is shrunk ‘drum tight’ it will not flap or detatch in high winds. Effective containment - Welded joints between individual sheets of shrink wrap scaffold sheeting create highly effective environmental containment and temperature control within the tent. Versatility - Because it is a shrink to fit solution, which is cut and welded ‘in situ’ there is no restriction on the size and shape of the scaffolding structure. The shrink wrap tent may be designed to follow the shape of the yacht. It might look like just any plastic sheeting, but to create a scaffolding enclosure that will perform for the duration of a refit project requires a shrink wrap sheeting that is engineered with specific characteristics. Ask your supplier about; Thickness – Whilst a 200 micron (7 mil) thick film may be good enough for shrink wrapping small boats for transport and storage, for scaffold shrink wrapping you should consider using a shrink wrap film of at least 300 micron (12 mil) thickness. Why? These construction grade films will be stronger and have better resistance to ultra violet light. Flame Retardant - Most shipyards today insist that any temporary sheeting used is flame retardant. Always ensure that the material you are using is marked (printed) as flame retardant including the standard or specification to which it has been tested. Common flame retardant standards used around the world include EN13501 in Europe and NFPA in the USA Ultra Violet Inhibitor - When a shrink wrap sheeting is exposed to sunlight over a long period of time it will begin to break down and become brittle. You should be suspicious of suppliers who claim that a shrink wrap film will have a life span of many years because this suggests that the film is not flame retardant or has minimal flame retardant additives (flame retardant and ultra violet inhibitor additives always compete.) Shrink Ratio - It seems fairly obvious that shrink wrap sheeting should shrink but there can be huge variations in performance between brands. Ask your supplier for a specification sheet and check the shrink ratio. You need a shrink wrap film that has balanced shrinkage. It will not be precisely the same but a shrink ration of around 60/40 is optimum. This will ensure that the sheeting shrinks very tightly around the scaffolding structure. Choosing Your Scaffolding Company Erecting a scaffolding structure around a super yacht is a skilled profession. These are some of the key points to consider when looking for a superyacht scaffold tent. Safety Safety should always come first when erecting and using scaffolding. Whilst basic structures may not require special permits, those that are longer, taller may require that engineering drawings be produced. As a minimum, the scaffolder should complete a detailed risk assessment and method statement prior to work commencing. Training Any scaffolding company should have proper training. Those that are registered with scaffolding bodies in the UK must have this training. Always ensure that you are dealing with a company or individual that has been trained in the proper use of scaffolding. Insurance It is a legal requirement in most countries that any company with employees has employers’ liability insurance. As the person responsible for employing the scaffolding, it is your responsibility to ensure that the company in question has appropriate insurance, Public liability insurance is also a legal requirement, and this ensures that if any damage is done to property or people are injured as a result of the scaffolding company’s work, they are insured to cover the damage. Experience Whilst standard scaffolding construction may be within a companies capability, the completion of marine scaffolding around a ship or superyacht may be considerably more difficult. In these cases, experience counts, and it will be required. Ask for examples of similar jobs undertaken. At Rhino we have worked with many scaffolding companies world-wide who specialise in shipyard work. If you require any assistance call our friendly team today.
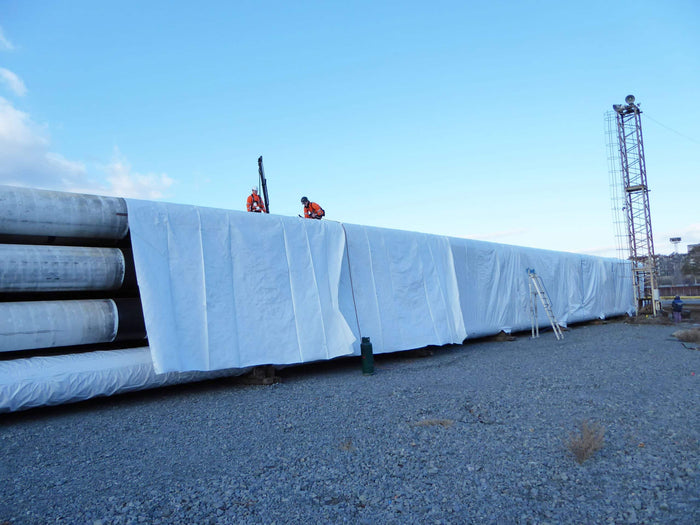
Industrial Covers for Pipe Line
In November 2015, we were contacted by South Stream Transport BV who were looking to find the best way of covering stacks of subsea line pipe, that were being stored ashore awaiting installation. South Stream Transport are an offshore pipeline company based in The Netherlands. Working with Gazprom, South Stream are building ‘TurkStream’, a pipeline under the Black Sea that will connect gas reserves in Russia to the Turkish gas distribution network and so provide energy supplies for Turkey and South-East Europe. Although, line pipe is designed to be a rugged product once installed on the sea bed, engineers from South Stream were concerned that pipe coating could be damaged by long term exposure to UV light during storage ashore. Some kind of covering was required but what type? The customer had of course considered using tarpaulins and had even carried out some trials of large tarps but these had not been 100% successful. Tarpaulins of course can be very useful but for this application they were proving bulky and heavy to lift which made them hard to install and some had been blown off by the wind. Why use shrink wrap sheeting ‘versus’ tarpaulins Robust – A shrink wrap cover will be shrunk ‘as tight as a drum skin’ around the line pipe stacks. This means it is much more robust than traditional tarpaulins which can be difficult to fit tightly. This means it will not flap and ‘self destruct’, even in high winds. Heat sealed joints – A shrink wrap covering is easily joined by heat welding two sections of cover together. This process creates a bonded and weather proof joint as strong as the original shrink wrap material and means that there is no limit to the size of area that can be completely encapsulated. Easy to repair – Because of the heat welding / sealing process, a shrink wrap cover is very easy to repair. Simply take a new section of shrink wrap and heat weld over the damaged area. Versatile – Because a shrink wrap cover is cut and heat welded by the installation team at the location it is required, there is no need to order specific sizes of cover in advance for different sized stacks and there is no need to ensure that a specific cover is used on a specific pipe stack. If the line pipe stack layout changes, this can be taken care of easily within the standard product. 100% Recyclable – Traditional tarpaulins can be difficult to recycle because of their composition, which makes the separation of materials problematic. However, a shrink wrap cover is very easy to remove and is completely recyclable. Because the shrink wrap is manufactured from 100% virgin resins, it is valued by re-processing companies. Typical applications for recycled industrial grade shrink wrap film are HDPE piping and agricultural films such as silage or bale wrap. Fundamentally, it is the two unique characteristics of the shrink wrap scaffold sheeting (the heat shrinking and the welded joints between sheets) that make it different to traditional types of scaffold sheeting. For example, once it has been fixed to the scaffolding and heat shrunk, it creates a very tightly fitting sheet which will not flap and self destruct like some types of sheeting. This makes it really strong and robust. The second result is that it is possible to create a completely sealed skin around a construction project without any holes or gaps typical of most sheeting systems. This makes it really good for those projects where the containment of dust and debris or whatever is required. How will the industrial covers be secured? When we look at a new application for a shrink wrap covering we need to consider how the sheeting will be held down or secured to whatever it is covering. When the cover is properly locked down into position, the heat shrink process will create a taught and ‘drum tight’ covering. For scaffolding encapsulation, the shrink wrap sheeting is simply overlapped around a horizontal tube or ‘ledger’ and heat welded back on to itself. For large industrial covers, such as these huge modules we wrapped for Interserve it may be possible to bring the shrink wrap completely underneath the object so that it is completely encapsulated. The first line pipe stack to cover was 48m (157′) long x 15m (49′) wide x 4m (13′) high – a total area of around 1224 square metres or 13,175 square feet. This was too large to lift and sheeting could not be slid underneath because the pipes were sitting on long wooden ‘bearers’. We considered running a band of strapping down each 48m side of the line pipe stack which we could overlap the shrink wrap around and heat weld back on to itself but at this length it would have been difficult to tension the strapping sufficiently to stop the cover ‘riding up’ around the pipe when the cover was heat shrunk. The solution was to encapsulate the lowest pipe running along the bottom edge of each stack with band of shrink wrap. This would mean that the top cover could be unfolded along the roof and down the side of each stack and could be then simply be heat welded to the lowest shrink wrapped pipe to lock it into position. The additional benefit of this solution is that it is completely ‘self contained’, i.e. it just needs shrink wrap sheeting and no additional tie downs or weights are required which had typically been used to hold down the more traditional tarpaulins during testing. However, the ends of each stack of pipes presented more of a challenge. The customer wanted to leave the ends of the stacks open which meant that we had to find some way of terminating the shrink wrap cover across the 15m (49′) width of the stack at a height of 4m (13′). To achieve this we installed and tensioned woven strapping. When the shrink wrap sheeting was installed, it was wrapped around this strapping and heat welded to itself to provide an anchoring point. What size and grade of shrink wrap sheeting will work best for industrial covers? We stock rolls of shrink wrap sheeting in a variety of widths from 4m to 16m wide and from 200 microns to 300 microns thickness. However, it is not just a matter of choosing the largest roll size possible. For this project we decided to use a 6m (20′) wide x 25m (82′) long roll of our 300 micron (12 mil) shrink wrap sheeting. This roll weighs 43Kg (95lbs), but whilst it is not exactly ‘lightweight’ is is more manageable than a 16m (52′) x 50m (164′) roll which weighs 163Kg (359lbs). A narrower shrink wrap roll width will often tend to have a much better ‘shrink ratio’ and that was important to us on this project because we wanted the covers to shrink down as tightly as possible around the line pipe stack. A tight covering of any kind will be much less likely to move, rub and flap and consequently will be much less likely to come off in strong winds. The 300 micron (12 mil) grade is probably thicker than many might select for industrial covers but because the covers could be in use for up to 2 years we felt that this would provide better protection than say a 190 micron (8 mil) shrink wrap which is often used for shrink wrapping boats and smaller industrial products during transport and storage. Because the customer wished to leave the ends of the line pipe stacks open, we felt there was a risk, during high winds, of the shrink wrap covering being damaged by being pushed up from the inside. As a ‘belt and braces’ approach we decided to fix straps over the shrink wrap covering which could be ratcheted tight and absorb the additional wind loads resulting from having each end of the cover open to the elements. What will be the installation process? With every installation project that we are involved in, it is vital that we can develop and document a safe system of work. With the exception of harnesses, we exclusively use safety equipment manufactured by Spanset in the United Kingdom. For this project in particular we used the Spanset Lightweight Fall Arrestor and the Spanset Recovery Block. The Recovery Block with a 15m line was secured to an overhead crane and used for the installation of the strapping. Once these straps were installed, our installers switched to the Lightweight fall arrestor which has a 3m line under constant tension. The Rhino Shrink Wrap Installation Team carry all necessary certification for the safe installation of industrial grade shrink wrap covers including; Site Supervisor Certification (SSSTS) International Powered Access Federation (IPAF) Pre-fabricated Access Suppliers & Manufacturers Association (PASMA), ‘GOTCHA’ rescue training (Spanset) Emergency First Aid at Work Construction Skills Certification Scheme (CSCS) Shrink Wrap Industrial Covers for Line Pipe – The Installation Process The time scale for this project was tight. We needed to get the first stack covered before the Christmas break. As shrink wrapping is always weather dependant on relatively calm winds and dry conditions we were hoping that the weather would be kind to us! We had shipped a pallet of materials in advance which meant that our 2 man team could fly out as soon as the materials landed and the customer gave us the go ahead. For this project, Kris Martin and Tom Mount from Rhino were selected to carry out the work. Both Kris and Tom had many years experience shrink wrapping scaffolds and general industrial products. After their four hour flight, they picked up their rental car and headed directly to the customer’s site to complete the induction, security checks and get site passes issued in order to get a rapid start to work the following morning. First, the customer wanted to verify that the coating of the line pipe would not be damaged by the heat shrink process so we were requested to undertake a test on a scrap piece of pipe before the full scale covering. The customer first placed temperature indicating strips around the pipe, in locations where the shrink wrap cover would be shrunk and also in locations where the shrink wrap sheeting would be welded together. Once the sheeting was installed, the covering was cut open to reveal that virtually no heat had been transferred through to the coating of the pipe during the shrink wrap process and we were given the all clear to continue with the work. DAY 2 - Encapsulate bottom pipe to act as anchor point for cover To begin, the bottom line pipe is encapsulated using a 3m wide strip of Rhino 300 micron shrink wrap film, along the entire 48m length of the bottom pipe on each side of the stack of line pipes. Install woven strapping at pipe ends to act as anchor point for cover Next, woven strapping (3.5 ton break strength) is installed to provide a termination point / ‘perimeter band’ for the top cover at each ‘open pipe end’ of the stack. Install first 6m x 25m shrink wrap sheet across stack Then the first 6m x 25m cover is unrolled to completely cover a 6m wide strip across the 48m long stack. (This first sheet will cover both the roof and the sides of the line pipe stack.) Heat weld first 6m wide strip The first 6m wide sheet is overlapped to the bottom shrink wrapped line pipe by 30-40cm and the two sections of shrink wrap cover heat welded together at ground level. The first 6m wide sheet is also welded around the tensioned strapping / ‘perimeter band’ installed at the open end of the stack. Install first ratchet straps Strapping is installed at 4m intervals up & over the first 7m wide strip and ratcheted tight. The benefit of this approach is that the work can progress in controlled stages. Even if it became windy before all the strips of shrink wrap sheeting had been installed and heat shrunk, the strapping keeps everything under control. The strapping is terminated / secured at either end by passing around a line pipe. (To secure strapping around line pipe it is necessary to make a small hole in the cover – this hole can then be taped or a patch of shrink wrap cover heat welded over the top). DAY 3 - Install remaining straps The next 10 runs of strapping are fixed into position. Kris and Tom switch from the 15m long fall arrest blocks to a 3m long lanyard which will attach to the 3.5 ton tensioned straps. Because the strapping is installed at 4m intervals, this means that it is not possible for an operative working on the top surface of the line pipe stack to reach the edge. Work to fix the cover in areas which are within 2m of the edge of the line pipe stack takes place from within a scissor lift. Install next 6m wide sheets of shrink wrap The 2nd and 3rd shrink wrap rolls rolls are unfolded by the two man team across the top of the line pipe stack and pass under the tensioned strapping previously installed. Join 6m wide strips of shrink wrap by heat welding together The 2nd strip of shrink wrap film is overlapped onto the 1st 6m wide strip by 30-40cm and heat welded to bond the sheets together. It is also welded the shrink wrapped bottom pipe. The 3rd strip of shrink wrap is overlapped onto the 2nd strip by 30-40cm and heat welded to bond the sheets together. It is also welded the shrink wrapped bottom pipe. Heat shrink cover ‘drum tight’ The 1st 6m wide sheet is now heat shrunk ‘drum tight’ both up the sides and over the roof of the stack. The process is repeated in 6m wide strips until the entire stack has been covered and heat shrunk tight. DAY 4 - Install self adhesive weather proof vents The final stage of the process was to install some self adhesive weather proof air vents. These vents allow a cross flow of air beneath the covering and also allow wind that enters the open ends of the stacks to be vented without damaging the cover. For this project we installed one air vent every 25 square metres, both over the top and along the sides of the line pipe stacks. Industrial Covers – Challenges Weather – On these large shrink wrap projects that require the work to be carried outside, the weather can be problematic. Light winds are require to shrink the sheeting ‘drum tight’ and where sheets of shrink wrap needed to be heat welded together, this can be difficult if sheets are wet. On this project, it snowed shortly after completion and this put extra pressure on the shrink wrap sheeting where it passed around the top corners of the line pipe stack, causing some splits to appear. It was subsequently decided that we would install a reinforcing patch on the shrink wrap cover in these vulnerable areas and that we would also improve the method of attaching the strapping / perimeter band at the open ends of the stacks. We manufactured a small but robust clamp which we fixed to the bottom row of open line pipe ends (and down each 4m high edge of the stack) at 2 metre intervals. When we passed the strapping through these clamp points it proved to be a much improved method for anchoring the shrink wrap sheeting at the ‘tricky’ pipe ends.