News
Read articles from the shrink wrap experts.
Joining Shrink Wrap? Stop Taping Welds!
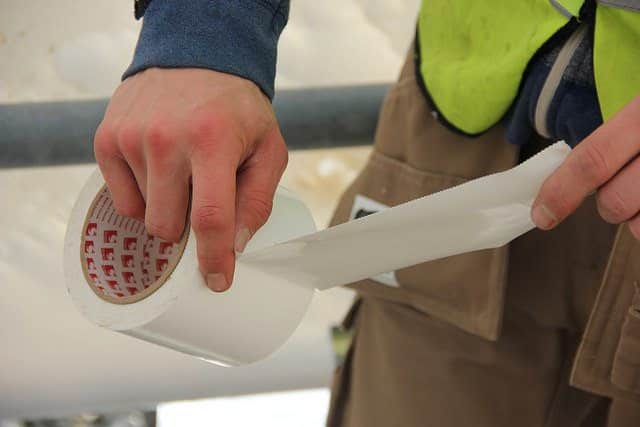
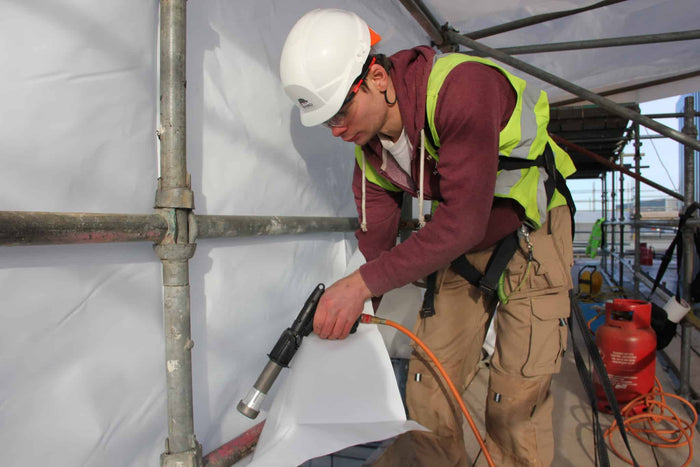
In addition, overlaps between sheets of shrink film are heat welded together which creates a ‘continuously bonded skin’ around a scaffolding structure. Sealed joints between sheets makes scaffold shrink wrapping useful for projects that require a high level of environmental containment. Because of the importance of joints when encapsulating a scaffolding with shrink wrap sheeting, I am often askedby scaffolders and shrink wrap installers about whether they should use shrink wrap repair tape, often called ‘patch tape’ to tape along every edge of the shrink wrap sheeting where it has been joined (heat welded) to another sheet. The simple answer is, no! If you are taping along the edge of the sheet then you are probably wasting both time and money. To show how using patch tape can really make a difference to your costs of encapsulating scaffolding consider the following example; A scaffolding project that is 12 metres high by 50 metres long would typically be shrink wrapped using two ‘drops’ of shrink wrap sheeting, (6m drop plus 6m drop), with an additional vertical join at least every every 15 metres. Shrink wrap repair tape / patch tape is normally supplied on a 100mm wide roll with a roll length of 33 metres, (although patch tape roll lengths of up to 55 metres are sometimes available.) To tape every horizontal and vertical weld would require at least 250 metres of patch tape which even on this small area is equivalent to nearly 8 rolls of patch tape or a cost of around £80.00, (and this doesn’t include the cost of labour needed to tape all those welds either!) Why do some shrink wrap installers tape shrink wrap joints? Poor quality shrink wrapping sheeting Low quality shrink wrap sheeting can have a major affect on the strength of heat welded joints. Typically, when first welded the shrink wrap can look as though it has been joined properly. However, after some time, the welded joint begins to separate and is easily peeled apart by hand. By taping the weld, the installer hopes to slow or stop the weld peeling part. My advice is to choose a supplier who can consistently supply a scaffold shrink wrap that when welded / joined – remains bonded with a joint strength greater than the original material. If the shrink wrap remain welded then it will require no additional reinforcement using adhesive tape. In my experience the price of genuine scaffold shrink wrap film is not much more than some of the cheap imitations, and when you factor in that you will not require to buy as much patch tape, using a high quality scaffold wrap might actually work out as costing less than the low quality ‘packaging’ grade shrink wraps. Lack of scaffold wrap training No matter what shrink film you use, it is important to understand how to use the hot air gun properly to create a robust weld. Welding involves heating two pieces of shrink wrap film close to their melt point using a hand held shrink wrapping gun. When this point is reached, normally noticeable by a smooth and glossy appearance, (and possible slight colour change), to the shrink wrap material, the operator presses the two pieces of shrink wrap film together and after a few seconds, the shrink wrap cools and is bonded. A welded joint between two pieces of shrink wrap film should be smooth, with as few wrinkles or air bubbles as possible. However, if the operative does not use sufficient heat or heats the plastic for too short a period, the melt point will not be reached and a proper bond will not be achieved. Trying to weld / join scaffold sheeting that is very wet or dirty may also create a join that is on insufficient strength. If you feel you need some scaffold shrink wrapping training, ask your supplier for help or guidance. They may even be able to send out an experienced scaffold wrap installer to get you on track! Temporary Roofs – The Exception! There is one important exception to the ‘no taping’ rule and that is where shrink wrap sheeting is being used as a temporary roof covering. Because water can often find it’s way through the smallest of gaps we advise that installers tape along the edge of all joints. The technique recommended by our own installation team is to start the roll of tape at one end of the weld. As the heat gun is used to weld the sheets together, the tape is unwound, bit by bit, in one continuous strip along the edge of the welded joint. The advantage of taping the weld as you go is that when the shrink wrap plastic is still warm, the tape will stick to and mould to the shrink wrap sheeting. This is particularly important wen the shrink wrapping on low temperatures. Summary Taping along every join between sheets of scaffold shrink wrap used to be essential for every project. As the quality of shrink wrap materials have improved, this is no longer necessary. You should only need to tape welds if you are using poor quality material or your welding skills need a little improvement. You will still need shrink wrap tape to make small repairs to the sheeting or to seal around locations where a scaffold tube is sticking through the sheet but you could be wasting money by taping along every horizontal and vertical join. Thanks for reading! As always, if you liked this article, please share. If you need any help or advice with any aspect of using shrink wrap sheeting for temporary weather protection or environmental containment get in touch with myself and my team; info@rhinoshrinkwrap.com or +44 (0)1477 532222.
3 Common Scaffold Shrink Wrap Problems (And How To Fix Them)
listening white shrink wrap as far as the eye can see, straight and uniform welded joints, not a wrinkle in site, all under a cloudless blue sky and installed in minutes. If you read the websites of most scaffold shrink wrap suppliers, you would be forgiven for thinking that scaffold shrink wrapping was a perfect solution to every temporary sheeting problem. However, when reality does not match up to those perfect photos and accompanying slick ‘sales patter’, new customers can end up disillusioned with shrink wrapping. Here then are the 3 most common scaffold shrink wrap problems and how you can solve them. 1. Welds coming apart The scenario goes like this; you are on a construction site shrink wrapping a scaffolding and you have welded the shrink wrap around a scaffold tube to secure the sheeting in place. All looks good. However, a few hours later you start to notice the welded joint is peeling apart and you can easily put your hand between the two pieces of shrink wrap film and seperate them apart further. This is a potentially serious problem because it is the welded joints that secure the temporary shrink wrap sheeting to the scaffolding structure so without these joints, the shrink wrap is going to lose it’s tension, start to flap and then potentially blow off if the winds are strong enough. Possible reasons for shrink wrap sheeting welds coming apart: 1. User Error: To get a strong joint or ‘weld’ between two pieces of shrink wrap film it is important to heat both pieces of film with the heat gun sufficiently, so that each piece of shrink wrap reaches it’s ‘melt point’. At this point, when the two pieces of film are pressed together (using leather welding gloves) they should be completely bonded. To help with this, scaffold shrink wrap installers try and get the hot air gun right between the two pieces of shrinkwrap, pressing the wrap together, and then immediately heating the joined area again from the outside. Inexperienced scaffold wrap installers may not give the weld enough heat or they may allow the joint to get wet or very dirty before attempting to heat weld it. Solution: Always make sure the shrink wrap is clean, dry and overlapped by 30-40cm before heat welding together. When making a shrink wrap weld try and minimise any wrinkles and air bubbles inside the weld because in a wrinkled and bubbled area, the wrap will not be bonded properly and this will make the joint significantly weaker. 2. Technical problem with the shrink wrap film: It could also be that you are not using a shrink wrap film with the correct specification for scaffold shrink wrapping. Shrink wrap film is generally described as a low density polyethylene film (LDPE). However, in reality there will be high density polythylene (HDPE) and medium density polyethylene added to the mix (MDPE). Why? The reason MDPE and HDPE is added to shrink wrap film is to make the production process easier. To make shrink wrap film, it is extruded from a circular ‘die’ and blown into a large bubble. Because of the size of the shrink wrap film used for scaffold wrapping (from 7m wide to 12m wide) the bubble needs to have a diameter of 7m or 12m and a bubble of this size made purely from LDPE is in danger of collapsing. In addition, MDPE and HDPE is added to speed up the processing of shrink wrap film through the extruder. Whilst this is great for the shrink wrap manufacturer (more speed = more rolls of shrink wrap film manufactured) it is not great for the shrink wrap installer because MDPE & HDPE has a much higher melt point than LDPE. This means that the shrink wrap installer may struggle to get enough heat into the polythene film to weld it together properly. When this happens, the shrink wrap installer ends up having to use shrink wrap patch tape to tape along the top of every weld. Before long, what with return visits to make repairs to the shrink wrap sheeting, and all the extra patch tape used, that cheap roll of shrink wrap film, might not be such good value after all… Solution: Ask your shrink wrap supplier for a technical datasheet. Ask them if they know what % of HDPE and MDPE is added to their shrink wrap film . Ask them to supply you some film from current stock and make a quick test yourself. 2. Holes appearing in the shrink wrap film A common problem can be seen during the heat shrinking process. Whilst you are passing the hot air from the propane shrink wrap gun over the film to shrink the film ‘drum tight’, (like spray painting), tiny holes appear and then grow larger as the shrinking of the film pulls them apart. Possible reasons for holes appearing during the heat shrinking of scaffold shrink wrap film: 1. User error: If a roll of scaffold shrink wrap film is dragged along the ground, repeatedly dropped prior to installation, or snagged on protruding scaffold fittings as the sheeting was pulled over the scaffolding, the damage can appear as tiny holes which get larger as the shrink film us shrunk tight. Solution: Ask your supplier to ensure your rolls are supplied individually wrapped so that they are protected until the time comes to install them. Always handle new rolls of scaffold wrap carefully and be carefull of snagging until the shrink wrap sheet has been clipped and heat welded into position. 2. Technical problem with the shrink wrap film: In addition, if the shrink wrap film has not been manufactured and specified for scaffold shrink wrapping it may not have the correct additives. Solution: Get a datasheet from your supplier. Ask them to supply you with a free sample of shrink wrap from current stock and test it yourself. 3. Thin patches visible in scaffold wrap after heat shrinking After completing the scaffold sheeting heat shrink process you may notice thinner or transparent areas in the white film. This is most visible from the inside when the light is shining through the shrink wrap from the outside. Possible reasons for thin areas in temporary shrink wrap scaffold sheeting: 1. User error: To shrink the scaffold sheeting the installer must pass the hot air generated from the shrink wrap heat tool, over the scaffold wrap film in a consistent way. If you heat an area excessively then the plastic wrap will become thin and even eventually create a hole. Solution: Holding the hot air gun 30-40cm away from the sheeting, pass the heat consistently so that the whole sheet is consistently heated. Make sure the weather conditions are appropriate. 2. Technical problem with the shrink wrap film: When discussing shrink wrap welds above we touched on the manufacturing process which involves extruding a ‘bubble’ of shrink wrap film. The control of the thickness of this bubble is critical. Often, shrink wrap film for scaffold wrapping may be manufactured by companies who mostly make plastic films for agricultural use and which generally does not require sophisticated manufacturing processes. Solution: The control of the shrink wrap films thickness must be computer controlled. Ask your scaffold shrink wrap supplier for a datasheet or specification for the shrink wrap they are supplying. Ideally, you need to look for ‘average thickness’ or ‘spot thickness’ of the film with a +/- variation of 10% or less. In this post we have looked at the 3 most common scaffold shrink wrap problems and explored some ways to solve them. If you would like to learn more about the scaffold shrink wrap installation process download our free guide; How To Shrink Wrap Scaffolding.
Scaffold Shrink Wrapping - What Materials Will You Need?
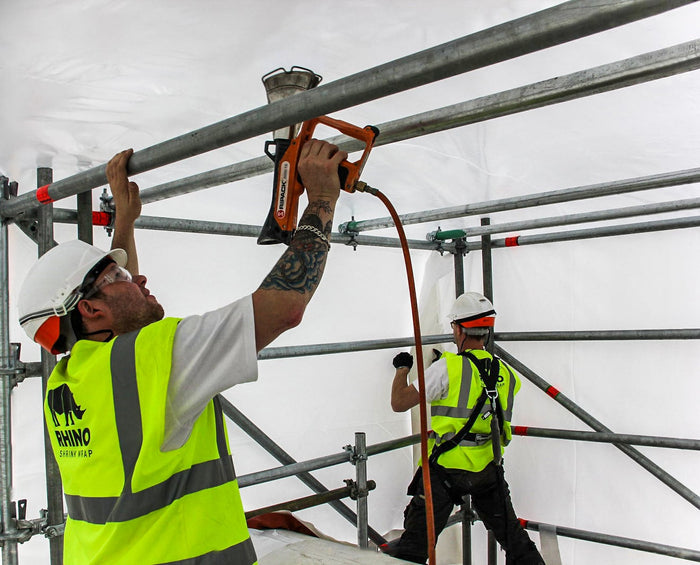
If you are considering gaining a competitive edge by offering shrink wrap sheeting to your customers, this 5 item check list explains what materials and equipment is involved and gives you some tips on how to get the best deal from your supplier. 1. Scaffold Wrap Film Shrink wrap film can be used to cover sides and/or the roof of a scaffolding structure to provide robust weather protection & environmental containment. Scaffolding shrinkwrap is a low density polyethylene film (LDPE), generally supplied as a 7m wide x 15m long roll. Although each roll will cover 105 square metres, because of overlaps and offcuts, I recommend that you allow for 90 square metres / roll, when calculating how many rolls of shrink wrap film are going to be required for your project. 300 microns is a typical film thickness. Thinner films, though suitable for internal scaffolding use, may be torn easily when fitting, whilst thicker films become heavy and difficult to weld/join properly. Choose a film that has been developed and tested for shrink wrapping scaffolds. Although different shrink wrap films can appear quite similiar, to get the best results you need a film that will weld and shrink even in tough weather conditions. Most construction sites will insist that the scaffold wrap materials you use are flame retardant. There are two common flame retardant standards in the UK that you need to be aware of. The EN13501 is the basic level that a flame retardant scaffold wrap film must achieve and is widely recogised. However, a shrink-wrap film that meets the more extensive LPS1207 and LPS1215 standards issued by the BRE's Loss Prevention Certification Board may be required on some projects. Check before ordering. Whichever you use, ask your supplier to send you their flame retardant certification and check that it is up to date. Shrink wrap sheeting is not re-usable. However, once it is cut from the scaffolding, (it does not actually weld/stick to the scaffold tubes themselves), it can be bundled and collected for recycling. Buyers Tip Although a supplier will supply you rolls in individual quantity, there will probably be a discount at the 'pallet quantity', which for a 7 x 15m roll will be equivalent to 30 rolls or 1 ton. If you need to buy just 1 or 2 rolls ask your supplier if they can send you the rolls of shrink wrap film using a courier as this can work out cheaper than shipping an entire pallet. 2. Shrink Wrapping Heat Gun The hot air gun is used for 'welding' the shrink wrap sheeting around the scaffold tube and of course heat shrinking the scaffold wrap 'drum tight'. A powerful tool! Typically 40-72kW or 136,000 to 245,000 btu/h. Powered by propane gas, (normally a red cylinder). I find a 13 Kg gas cylinder is generally easiest to use and move around a site. A new shrink wrapping heat gun is generally supplied complete and ready to use with a regulator and 8-10m long hose. Try and choose a hot air gun that is supplied in a hard plastic carry case to prevent damage when being transported to and from jobs. You may find some hot air guns look like 'roofing torches' used for heating bitumen etc. Whilst these can also be used for shrink wrapping my main concern with these is that the gun produces a constant flame, even if the operator should drop the tool. I prefer hot air guns that incorporate a 'dead mans handle' - if an operator drops the hot air gun and/or releases the trigger, the gun stops and there is no flame whatsoever. A number of manufacturers produce heat guns for shrink wrapping pallets and these are generally quite suitable for shrink wrapping scaffolding. Well known manufacturers are Ripack (France), Shrinkfast (USA), Shrinkit (UK) and Guilbert Express (France). Although a single hot air gun is enough to get started and carry out small shrink wrap jobs of up to 150 square metres, you will need at least two hot air guns to get the shrink wrap job completed in the most efficient way. Buyers Tip Don't forget your leather shrink wrapping gloves, sometimes called 'welders gauntlets'.It is is essential you wear welding gloves during the shrink wrap welding - the shrink wrap film can get quite hot! See if you can get your supplier to throw a pair in for free. 3. Shrink Wrapping Clips A re-usable metal clip that is used to temporarily hold sections of shrink wrap sheeting in place prior to heat welding. Not 100% essential, patch tape can also be used to hold the shrink wrap film in position prior to heat welding, but they do considerably speed up a shrink wrapping installation work and can work out more cost effective in the long term. Generally supplied as a box of 100 shrink wrapping clips. Clips can be removed as soon as the shrink wrap sheet is welded into position. If you are careful to collect the clips afterwards, one box should last a long time! 4. Shrink Wrapping Tape Shrink Wrapping Tape is used to repair small holes, tape welds and seal around any protrusions A thick white polythylene tape designed to 'blend in' with the shrink wrap sheeting. Normally supplied as a 100mm wide tape on rolls that are 33 metres long. A shrink wrap patch tape should be easy to tear by hand. A 'pinked' edge to both edges of the tape (a zigzag cut during the manufacturing process) can make tearing the tape by hand a little easier. Buyers Tip Most suppliers will supply you patch tape as individual rolls. However, there will normally be a discount for buying tape as a box of 12 rolls. Ask your supplier. If you use a good quality shrink wrap film you should not have to tape along the lines of any welds and this can save a lot of unnecessary extra costs. 5. Training Whilst scaffold shrink wrapping is a straightforward concept, most find some kind of shrink wrap installation training useful, to get the benefit of learning from someone elses experiences and to get certification that they can give to customers to prove they are competent. Try and look for a training session that combines a theory and practical training with some on site support for your first job. In my experience, scaffolders who have additional on site support for the first one or two jobs they are undertaking are more likely to get the results their customers are looking for and carry on to become experienced shrink wrap installers. I think the best training is carried out by those who have first hand experience of what can and cannot be achieved with the shrink wrap project. Make sure you find about your trainers experience and qualifications. Buyers Tip The costs of shrink wrap training sessions have been falling steadily over the last few years so negotiate hard to get a good deal for your company. After all, once you are trained, your supplier should benefit from shrink wrap material sales in the long term. The information here is an introduction to the materials and equipment required for shrink wrapping scaffolding structures and how to get the best deal from your supplier. To find out more, contact our friendly team today!
Calculating materials & labour for profitable scaffold shrink wrapping
Scaffolders often ask me to advise them how much materials they are going to need for a scaffold shrink wrapping job or how much labour to allow. This article shows how to calculate the costs on a ‘per square metre’ basis and aims to help make your next scaffold shrink wrap job profitable and hassle free! The information here is based on many years personal experience setting up and running multiple shrink wrap installation teams and supplying materials to scaffold companies large and small. I hope you find this information useful. If you think others would too, please share! 1. Scaffold Shrink Wrapping Film A roll of shrink wrap film for scaffolding is typically supplied as a 7m wide x 15m long roll of 300 micron thick, flame retardant shrink wrap sheeting. In theory this means that you can cover 7m x 15m = 105 square metres of scaffolding per roll. In reality, after taking into account areas where sheets need to be overlapped or welded around a scaffold tube I find that 90 square metres is a more realistic figure for usable square meterage per roll of shrink wrap. If a roll of 7m x 15m typically costs from £156 to £186 / roll, (depending on the volume discount your supplier can offer you), this means the actual cost per square metre for shrink wrap materials is going to be £1.73 – £2.07. (£186 / 90 square metres = £2.07). 2. Shrink Wrap Tape If you are using a shrink wrap film that has been engineered for scaffold shrink wrapping then after heat welding the scaffold shrink wrap should stay bonded – you should not need to tape over the edge of each join to help it stick. Neverthless, I always allow for one roll of tape (100mm x 33m roll) per roll of shrink wrap film that is being used on a job. If a roll of tape costs £9.95 then the cost per square metre is 11 pence. (£9.95 / 90 square metres = £0.11). 3. Gas I generally recommend a 13Kg cylinder size as these are convenient to move around a scaffolding and construction site. The amount of gas consumed will depend on the shrink wrapping gun you are using and the skills / technique of the shrink wrap installer. A powerful gun will use 6-7Kg of propane gas per hour but of course, assuming the installer knows what they are doing, will allow you to shrink an area much faster. Based on the most powerful scaffold shrink wrapping torch available – the Rhino Shrink Wrapping Torch – one x 13Kg bottle of gas will be enough to install 500 square metres of shrink wrap. If we assume a 13Kg bottle of Propane gas costs approximately £20 / cylinder then this equates to just 4 pence per square metre! (£20 / 500 square metres = £0.04). 4. Labour How much shrink wrap should an installer be able to shrink wrap in a day is a very common question which can be difficult to give a definitive answer to as it will very from job to job. As a guide I assume that one man should be able to install at least 200 square metres per day for most jobs. This may be reduced to an absolute minumum of 100 square metres per man per day on particularly ‘difficult’ jobs. The difficulty of a scaffold shrink wrap job may depend on; Scaffold Structure – A well designed, flush scaffolding will be much faster to wrap than one with many protrusions. Similiarly, straight runs are easier than multiple facades. Site – Some sites make it difficult to get men and materials to the working area. This may be due to local procedures or just logistics. Central London sites or track side projects are examples of this. Weather – Attempting to battle wet and windy conditions will slow up the installation rate and may also effect on the quality of the finished shrink wrap job. Based on an average of 150 square metres per man day, and a labour rate of £150/day, I normally estimate the labour cost to be around £1 / square metre. I wrote this article, which is based on my own experiences, to help scaffolders who carry out their own scaffold shrink wrap jobs, make sure that they are taking into account the key costs involved. For most scaffolding encapsulation and containment jobs, the main ‘consumable’ items and costs are listed below; Shrink Wrap – £2.07 / m2 (or less depending on volume) Tape & Gas – £0.15 / m2 Labour – £1.00 / m2 (or less depending on project and experience) In conclusion, with some planning of the scaffold structure and by choosing a good weather window it should be possible to install most scaffold shrink wrap for £3-£4 per square metre. However, using poor quality materials that require visits to repair or installers who are not trained or experienced could add to this. At Rhino we are always happy to answer your questions, just contact us. If you find this information useful, and think others might too, please share. This article assumes that you already have a shrink wrapping gun and scaffold clips and looks at ‘consumables’ only. If you would like to learn more about the scaffold shrink wrap process, including the equipment involved, why not download Rhino’s free guide – How to Shrink Wrap Scaffolding.

Our Story - An interview with Steve & Aubrey, founders of Rhino Shrink Wrap
Steve & Aubrey, the founders of Rhino Shrink Wrap, talk about how they got started with shrink wrap and share their advice for starting your own shrink wrap business. How did you start shrink wrapping Aubrey In December 2003, I was taking a vacation in Boston, Masachussets. Whilst taking a walk along the waterfront, I came across some large sailing yachts that were being stored ashore in cradles. These yachts had been shrink wrapped to protect them against the tough winter weather that the American North East experiences. I was immediately intrigued by the look of the shrink wrap – it was so smooth and tightly wrapped around the boat that it almost looked like it had been sprayed on. It was such a contrast to the flapping tarpaulins and boat covers I was used to seeing in the boatyards back home in England. I’d always had that ‘itch’ to start my own business and just a few months later, I quit my job to start a business providing a shrink wrap installation service in the South West England. My first office was the spare bedroom at home, my warehouse was a shipping container and I practiced my shrink wrap skills on boats that I found abandoned & overgrown in local boatyards. Steve It’s funny because we don’t shrink wrap that many boats in the UK nowadays but it was the marine industry that first got me involved in the shrink wrap business too! I’d always been interested in boats and sailing and I first saw boats shrink wrapped for the winter in Southampton, England. I’d run a transport company for many years but I set up my first shrink wrapping company called ‘Plaswrap’ in 2009. We were a small team with everybody ‘on the tools’; even my Dad helped out occasionally! Why did you set up Rhino Shrink Wrap? Aubrey I ran first shrink wrap company for about 8 years and in that time the business grew from a startup into a multi million turnover shrink wrap company. However, I felt ready for a new challenge. I sold my share of the business and headed once again to the USA & Canada for a few months to get inspiration & ideas for a new business. Most of the ideas I worked on in this period did not develop into a business – except for one! When I eventually returned to the UK I founded an inflatable construction tent company called ‘Fast Tent’ (now called Njordair). I’d never planned to start shrink wrapping again but the break had given me fresh ideas and in 2014 Steve & I joined forces to founded a new shrink wrap company. We decided to call it Rhino Shrink Wrap, as we felt that this was a distinctive brand which would reflect the tough nature of the products we wanted to create. Steve When I was growing up, in my local area there was a construction company called Pochin and they had an elephant as their logo which was very distinctive. The Rhino Shrink Wrap brand was partly inspired by the Pochin logo I saw on the side of their trucks as a kid. Why is Rhino different to other shrink wrap companies? Aubrey Our biggest difference is that we are not just a supplier of shrink wrap materials. Because we have also installed shrink wrap materials for many years we advise our customers how to install it. This focus on knowledge and education means we are the only shrink wrap company in the world to offer an online certified shrink wrap training. Steve I think that many shrink wrap manufacturers don’t really understand how the end users are working with the shrink wrap. We have the closest possible relationship with our factory. Aubrey and myself have a combined 30 years of shrink wrap installation experience, whilst the factory have one of the most advanced shrink wrap production lines in Europe & experience manufacturing highly technical shrink wrap films. That combination of experience benefits our customers. What’s the best thing about running a shrink wrap business? Aubrey ‘Shrink Wrapping’ might not sound like the most exciting business but it never gets boring as every job presents you with a different challenge. As a shrink wrapper you get to work in a wide variety of places (that often would not normally be accessible to the general public). Steve My favourite bit of running shrink wrap businesses is getting to know customers, suppliers & installation partners from all over the world. Over the years, many have become good friends. What are the challenges faced by the business? Aubrey The cost of shrink wrap materials is rising at the fastest rate for many years. We try to absorb these rises but of course this is not always possible. Because most shrink wrap looks the same when it is folded and rolled for sale, our challenge is to help customers understand that you really do ‘get what you pay for’ and that ‘bargain price’ is probably at the price of reduced additives such as FR & UVI and this can lead to much bigger costs in the long run (such as when covers blow off). Steve Although shrink wrap, particularly when used to encapsulate a construction project, is used to protect the environment, we have to work harder on improving sustainability in general. At Rhino Shrink Wrap we have been focusing on driving environmental awareness through our online education & training but there is much more to be done. Most recently we have invested in new machinery that allows us to convert jumbo rolls into custom size rolls for customers which reduces waste on site. What advice would you give to somebody who is considering setting up a shrink wrap business? Aubrey Do it! The great thing about starting a shrink wrap business is you don’t need a big investment in materials and equipment to get up and running. You can start small, like Steve & did and just take things one job at a time, slowly building your skills and confidence with each job. It’s never too late – we’ve helped people of all ages and all backgrounds get up and running – you just need a willingness to get ‘stuck in’. Steve One of the most important lessons to learn is when you should say ‘no’ to a project. It’s not the jobs that you don’t win that will hurt your business but the ones you do! You don’t get paid until the money is in the bank so credit check new customers and keep an eye on your debtors!
Scaffold Wrapping For Containment – What is Final Seal?
Any discussion of a scaffold wrap project where the containment of dust and debris is the key requirement, usually involves looking at ‘final seal’. In scaffold wrapping, final seal describes the point where the shrink wrap sheeting is joined to the wall / ceiling / floor. Final seal can create quite a challenge. The easiest type of containment is on internal projects such as a temporary interior partition. In this situation, the scaffolding is erected so that a scaffold tube is run parallel to the surface. The shrink wrap is then wrapped to the scaffolding in the normal way. The next step is to fix a ‘shrink wrap skirt’ between the sheeting and the floor / wall / ceiling. If the surfaces are suitable, i.e. smooth, clean and dry then this skirt can be taped into position and the final seal has been created. However, in many cases, it may not be possible to simply tape a skirt into position. Powerful adhesives can be used although it must be noted that these can leave behind a residue which may be difficult to remove – certainly not ideal for heritage projects. Another reliable way of creating a final seal between the shrink wrap sheeting and a floor / wall / ceiling is to use a wooden batten. This is often use during the construction of building screens. Often a wooden batten will be used to fix the sheeting to the toe board or boards on the lowest lift of the scaffolding. Typically, ‘Cordeck’ or similiar will then be laid over the boards. As always, for advice and guidance on achieving ‘final seal’ give the Rhino Shrink Wrap team a call on +44 (0)1477 532222 or call info@rhinoshrinkwrap.com.
How Tightly Does Shrink Wrap Sheeting Fit Around Scaffolding?
Want to see just how tightly shrink wrap sheeting is fixed around a scaffolding? This short video demonstrates shows how the sheeting is fixed ‘drum tight’ and includes some pictures of completed projects.
I Need a Temporary Roof Cover - What Are My Options?
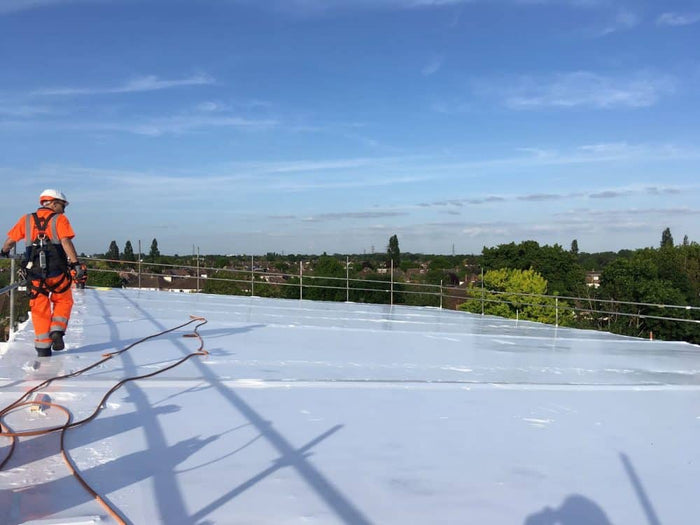
This guide takes a closer look at shrink wrap plastic sheeting and how it compares to other methods of covering a temporary roof. We compare performance in areas such as project planning, speed of fitting, weather resistance and appearance. Read on to see if shrinkwrap is right for your next project and get some tips and tricks to help make sure your next temporary roof cover is successful. A temporary roof is usually used to create a weather protected covering for a building project. There are a variety of sheeting options for cladding a temporary roof including tin or zinc roofing sheets, (often referred to as ‘CI sheets’), temporary roofing ‘systems’ such as Haki, Ubix etc or shrink wrap sheeting. A controlled environment can mean different things. Sometimes it is simple as keeping a work area dry. Other times there may be more specific requirements for temperature or humidity control. Corrugated Iron The traditional material used to cover a temporary roof scaffolding sheets of corrugated iron. Also sometimes known as tin sheets, or CI sheets, putting a ‘tin hat’ over a construction project is still used today. After the scaffolding has been erected, sheets of corrugated iron are laid over the roof in an overlapped tile configuration and secured to the roof trusses beneath. Used carefully, the tin sheets can be re-used on multiple jobs but they require lifting into position individually so the labour costs for fitting can be high and of course, involve scaffolders working on the roof. For an example of a temporary roof using CI sheets click here. Advantages: Re-usable Disadvantages: Does not let light through to the work area underneath. Health & safety considerations. Large upfront investments in sheeting. Keder Roof Keder describes a temporary roof sheeting technique that is utilised by a number of large manufacturers. With this product aluminium beams of either 1.5m or 3.0m length are fitted together up to a maximum span of 15m. Although the exact design may differ depending on the manufacturer, the aluminium beams incorporate tracks (like the track which allows a sail to be pulled up the mast on a sailing boat). Stiffening of the trusses is achieved by double and single tie bars and diagonals with snap-on ‘claws’. The bay width of this product is 2.57m. Once the beams are installed, the sheeting with sealing beads (Keder) is pulled through tracks in the beams. For a really in depth explanation of Keder sheeting systems click here. Keder systems is a very effective option in terms of temporary roofing. It can create a light working environment however the lack of versatility means in some cases, shrink wrap can be a better suited solution. Advantages and disadvantages of Keder are. Advantages: Re-usable sheets Creates a light working environment Disadvantages: Can be costly Not as versatile as shrink wrap Planning a shrink wrap temporary roof Although, shrink wrapping does not require the initial scaffolding design considerations of a temporary roof system such as Haki or Ubix, covering a scaffolding roof with shrink wrap sheeting will always need some planning. take advantage of the best weather window as fitting shrink wrap sheeting in wet and windy conditions will significantly affect the strength & performance of the product. Additional scaffold boards will need to be fixed securely on the roof surface to batten the shrink-wrap and a hand rail will be required around the perimeter of the roof to provide edge protection and to provide a point for anchoring safety lines for additional fall protection. In addition there will need to be some planning to take advantage of the best weather window as fitting shrink wrap sheeting in wet and windy conditions will significantly affect the strength & performance of the product. Finally, your team may need some kind of shrink wrapping training to achieve the results you or your client are looking for. Speed of Fitting Corrugated tin sheet, (CI) is generally fitted to the scaffolding structure in 2m x 1m (2 m2) sections, (after overlaps have been taken into consideration) whilst shrink wrap is generally fitted as a 7m x 15 (105 m2) sections which seems to be a clear advantage for shrink wrap sheeting in terms of fitting speed. However, fitting a shrink wrap sheet to a temporary roof scaffolding requires more than just rolling it out over the roof. The film will need to be battened down at intervals across the roof (we recommend every 2 metres), overlaps with other sections of shrink wrap will need to be sealed by heat welding and finally the entire shrink wrap cover will need to be heat shrunk ‘drum tight’ by heating the entire area of the roof sheet using a hand held propane gas hot air gun. Weather Resistance Rain : In terms of stopping water ingress, shrink wrap sheeting offers far fewer joints than a tin sheet roof and any joints that are present are sealed by heat welding. Fewer gaps mean much less opportunity for rain to penetrate. Wind : When used as a sheeting for the sides of scaffolding, shrinkwrap is generally considered to be the most robust temporary sheeting product on the market. Temporary roofs can present more of a challenge. In this case, a high wind blowing over a shrink wrap roof creates a low pressure area underneath the shrink wrap which creates a considerable upward force or suction. To prevent damage we recommend the scaffolder securely clips scaffold boards to which the shrink wrap can be battened at intervals of approximately 2 metres. (These boards, which are generally installed as a run three boards wide also provide access to the shrink wrap sheeting after the sheet has been unrolled). Installers Tip – When battening a shrink wrap sheet over a temporary roof, we install a self adhesive strip of foam between the batten and the shrink wrap. This foam acts as a gasket to prevent any water ingress through screw holes in the shrink wrap. Appearance A shrink wrap roof will have a clean, smart and professional appearance compared with one constructed from tin sheet and the working area underneath will be considerably lighter. By continuing the shrink wrap sheeting down the sides of the scaffolding, the entire area can be encapsulated and contained as a continous sheet. One of the main advantages of using shrink wrap sheeting as a temporary roof covering is that it is easily adapted to the size and shape of the scaffolding structure, however ‘awkward’ that may be. Dismantling a Temporary Roof One aspect to consider when comparing shrink wrap sheeting versus tin sheeting for a temporary roof covering is the time taken to remove the roof cover when the project is completed. The shrink wrap film can simply be cut off in sections and bundled for collection for recycling at the site or back at your yard. This will be considerably quicker than removing tin sheets and stacking for transport back to the yard. Is A Shrink Wrap Temporary Roof Right For Me? No product is right for every situation or application and this is certainly true for temporary roof covers. For the largest of temporary roofs, the ‘system’ roofs offer a number of advantages and have been tried and rested on some of the most high profile construction projects in the UK. Shrink wrap sheeting is most suited for smaller and awkward temporary roofs.