News
Read articles from the shrink wrap experts.
How Should I Set Up A Scaffold Structure For Shrink Wrap?
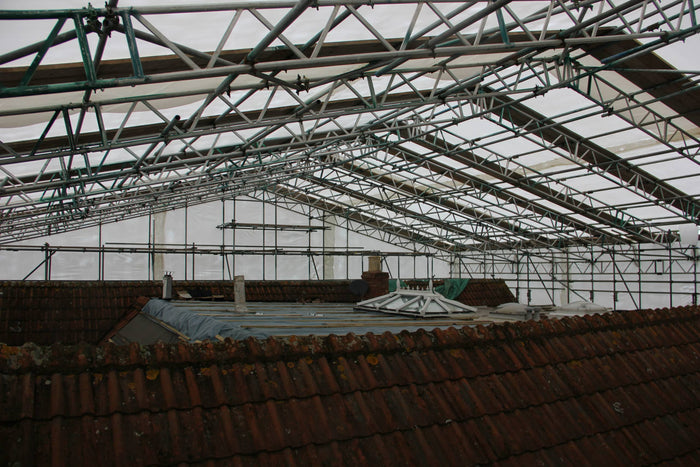
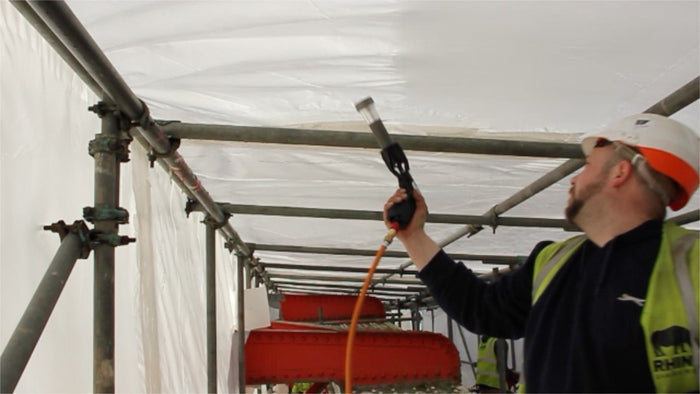
What Is The Best Way To Set Up a Scaffolding Structure For Shrink Wrapping? Rhino Shrink Wrap sheeting is a versatile covering for scaffold structures of any dimension or shape. However, following the guidelines on this page when the structure is being erected will make the shrinkwrap covering easier to install, more effective, and a professional appearance. Preparation is the key! These notes are intended as a general guidance to setting up a scaffolding structure to get the best result from your shrink wrap sheeting. However, as with all types of scaffold sheeting, always seek the advice and guidance of a qualified scaffolding designer to ensure that your structure can withstand the additional wind loading that will result from the application of sheeting. Scaffolding must be complete and inspected prior to shrink wrap installation Introduction A scaffold which is to be shrink wrapped should be erected in line with the NASC’s TG20:13 guidelines. As of June 2014 it is the only guidance that is acceptable to the Health and Safety Executive. TG20:13 has been issued as the industry technical guidance on the use of the European Standard BS EN 12811-1 and applies to all tube and fitting scaffolds. It may seem obvious, but the first thing to consider is that shrink wrap sheeting requires a support structure wherever the weather protection and / or containment is required. You might be surprised how many times we are asked to fix sheeting to an area where there is no scaffolding to attach to! Fully boarded access, complete with handrails, is required to every part of the scaffolding that requires sheeting. The scaffolding should be complete and inspected (Scaff Tagged) prior to shrink-wrap sheeting installation. It is the responsibility of the client / scaffolder to ensure that the scaffold is designed & built to withstand any wind loadings resulting from scaffold sheeting. (This is the case with all types of sheeting – ‘Monarflex’, shrink wrap etc) Protrusions Apart from having a huge impact on the appearance of your shrink wrap scaffold sheeting, a scaffolding with lots of protrusions will slow up the daily installation rate. It will be hard to get the sheeting straight and although cutting around protruding tubes is a relatively quick process, resealing and taping around tubes can be time consuming. Alternatively, a flush scaffolding with dedicated sheeting rails can make the daily installation rate much faster. The amount of shrink wrap sheeting that can be installed in a day has an affect on the price. For more information on shrink wrap pricing / costing factors click here. Ledgers Ledgers should be flush with the main body of the scaffolding. Although it is possible to cut shrink wrap around a protruding scaffold tube or scaffold board (and then tape / heat weld the shrink wrap back together) this can make fitting the shrink wrap very time consuming and will not look very tidy. Furthermore, even after resealing the shrink wrap around a protruding scaffold tube it is going to be very difficult to achieve 100% containment or weather protection. Handrails Handrails should be installed so that they are flush with the main body of the scaffolding. Sometimes a handrail will be used where a horizontal join between sheets of shrink wrap is required. Standards Standards should be flush with the main body of the scaffolding. Boards Scaffold boards should be flush with the main body of the scaffolding. Protrusions through shrink wrap sheeting Flush tube and fitting scaffolding structure Heat shrink sheeting around scaffold fittings Sheeting rail used on edge of small temporary roof Sheeting rail to hold wrap away from fittings Sheeting rails A sheeting rail, installed every other scaffolding lift, can improve the appearance of a shrink wrapped scaffolding by holding the sheeting away from scaffold fittings. Although the shrink wrap is shrunk ‘drum tight’ so that it molds very tightly around fittings, over long periods of time, in windy locations, fittings can start to cause holes in the sheeting. Although these can easily be repaired using shrink wrapping repair tape, a sheeting rail can help to prevent holes. Final seal Final seal is required for projects that require total containment. It is particularly important that the scaffolding structure is flush and protrusions are minimized. A scaffold tube should be installed parallel to and as close to the ground, wall, ceiling etc. The main body of the shrink wrap sheeting will be secured to this tube. A shrink wrap skirt will then be welded / taped between this tube and sealed to the floor / wall / ceiling using wooden batten or adhesive. An alternative technique is to put scaffold boards on the ground and build the scaffold on top. The shrink wrap sheeting can then be battened to the boards at ground level and provide an effective final seal. Final seal Joining Shrink Wrap Sheeting (Scaffolding) Horizontal join (viewed from outside) Horizontal joints between sheets Shrink wrap sheeting is normally supplied as a 7m wide x 15m long roll. Although it can be hung any way up, the usual process is to use the 7m width of the sheet to cover 3 ‘lifts’ of the scaffolding. 3 lifts is the largest ‘drop’ we recommend. For some projects, it may be preferable to reduce the drop to 2 lifts or even 1 lift if very high wind speeds are likely. When shrink wrapping scaffolding that is higher than 6m, it is therefore necessary to make a horizontal join between sheets. The most robust way of making this join is to run a double scaffold tube around the scaffolding at the height where the join is required (approximately every 6 meters). The double tubes should be positioned close together, (5-10 cm is ideal). Sometimes the double tube of the scaffolding handrail is used as a horizontal joining point for shrink wrap. This is acceptable, however, because handrail / guardrail tubes can be up to 47 cm apart, this can lead to more shrink wrap film being used than is strictly necessary to complete the job. In this way, each section of shrink wrap is attached separately to the scaffolding structure and each one is fitted behind the other (like tiles on a roof). Want to learn more about creating horizontal joints between shrink wrap? Watch the video below. Where do you want the scaffold sheeting to end? Shrink wrap scaffold sheeting needs to be secured before it is heat shrunk ‘drum tight’. Install a ledger at the point where the shrink wrap sheeting is to finish. A handrail can be used for this purpose. Bottom ledger Temporary roof Temporary Roof Structures Shrink wrap sheeting can be used as a temporary roof covering, either to provide temporary weather protection or environmental containment to a construction project. To shrink wrap a temporary roof safely you should bear the following points in mind; General points; Any roof scaffolding which is to be shrink wrapped must be constructed to allow rainwater to drain easily from the roof surface. The minimum pitch of a shrink wrap temporary roof scaffold should be 10% or 1:10. The installation of shrink wrap sheeting to create a temporary roof will require the installer to access the top surface of the roof. For this reason it is important to set up a handrail around the roof edge / perimeter of the roof. The handrail provides edge protection to the installers and allows the installers to set up and tension safety lines between handrails if required. (NB that where safety lines are used, it will also be necessary to have a rescue plan and operatives trained in the use of casualty recovery equipment such as the ‘Gotcha’ rescue kit by Spanset – spanset.co.uk) Having a handrail around the roof edge does not cause significant problems for installing the sheeting. This is because we always recommend shrink wrapping the sides of the scaffolding first and then overlapping the sheeting by 30-40cm onto the top surface of the roof. This means that the side sheet only needs to be cut to go around the handrail stanchions by 30-40cm from the edge of the sheet. Subsequently, when the roof sheeting is unrolled it in turn is overlapped over the edge of the roof and down the sides of the scaffold sheet by 30cm. This means that the roof sheet only needs to be cut around the stanchions by 30-40cm from the edge of the sheet. The roof sheet and side sheet are then joined by heat welding them together. Finally, patch tape is used to make a seal around the base of each stanchion. What is the size of your temporary roof? Small roofs / canopies (up to 5 meters width) For a small roof (where there is ‘arm’s reach’ access to the entire underside of the roof) then no additional boards are required to be installed in the roof structure. This also applies to where a canopy is required over the top lift of the scaffolding. As long as the installers can access the underside of the canopy from the top boarded lift then no additional boards are required. Medium sized roofs Where possible, the temporary roof should be fully boarded out with scaffold boards. This will allow the installer to easily access every part of the shrink wrap roof covering to create welds between sheets and to heat shrink the film ‘drum tight’. Secondly, the boards provide an anchor point for the scaffold shrink wrap film. Once the shrink wrap has been pulled over the temporary roof structure, the installer will batten the shrink wrap to the boards at 1-2 meter intervals. It is therefore important that the boards are properly and securely clipped / fixed to the roof structure as there will be wind loadings applied at these points. Large roofs Where it is not possible to fully board a temporary roof structure, (perhaps due to weight restrictions) then a run of boards, three boards wide, every 2 meters (2 meter centers) is the minimum requirement with run of boards around the roof edge. Small temporary roof covering Fully boarded mid size temporary roof Partially boarded large temporary roof
What's the difference between boat, industrial and scaffold shrink wrap?
Large shrink wrap film is typically sold for scaffold shrink wrapping or shrink wrapping boats and other large industrial products. However, because different shrink wrap films can look and feel quite similar, picking the right film for the job can be confusing. This quick guide will help you get it right.

What is LPS Certified Scaffold Sheeting and Why Is It Different?
Flame retardant shrink wrap standards and certification can seem confusing. How would you prove, if challenged, that you had taken all reasonable steps to ensure that the product you supplied met the flame retardant standards? Read on for facts and links to resources to help you fulfill your health and safety obligations with confidence.
Which Shrink Wrapping Hot Air Gun Is Best For Scaffolders?
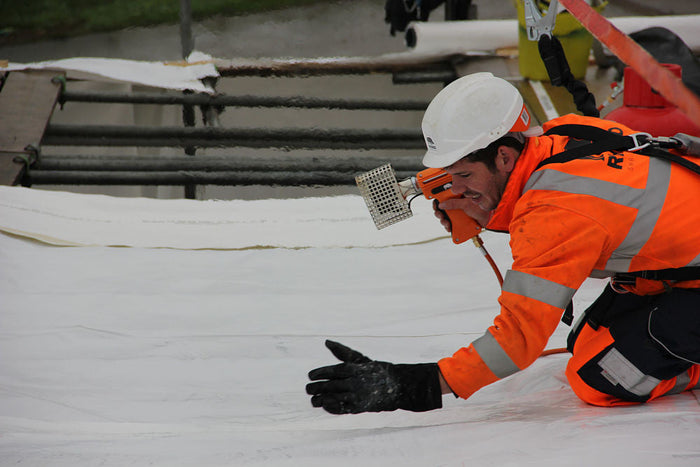
Over the last 20 years, scaffold shrink wrapping has become a recognised method of encapsulating scaffold structures, either for temporary weather protection or containment of dust and debris, particularly where a more robust solution is needed. Although the heat tools used for shrinking the scaffolding wrap have to do the same job as for industrial packaging, i.e. quickly heat the shrink wrap film to a high enough temperature that it begins to shrink, the demands on the heat tools used in the construction industry are greater.
Scaffold Shrink Wrapping - Do It Yourself or Sub Contract?
This week I received an email from the contracts supervisor of a scaffold company based in Manchester. His company had a few customers who required working scaffolds with full weather protection. He had previously looked into training a few of the lads on shrink wrapping and buying the equipment and materials but somehow had never got around to it.