How To Guides
Practical, field-tested how-to guides for installers and project teams.
How do I Remove Shrink Wrap From Scaffolding?
Rhino offers expert solutions for mastering the art of shrink wrap removal from scaffolding. Elevate your skills with our detailed training.
How Do I Join Shrink Wrap To Scaffolding?
Master the art of Shrink Wrap with our Rhino Comprehensive How-to Guide. From basic principles to advanced techniques. Click now!
How Do I Shrink Scafflold Wrap?
Rhino presents a detailed guide - Mastering the Craft: How to Shrink Scaffold Wrap. Learn the techniques and excel in this essential skill.

How Should I Set Up A Scaffold Structure For Shrink Wrap?
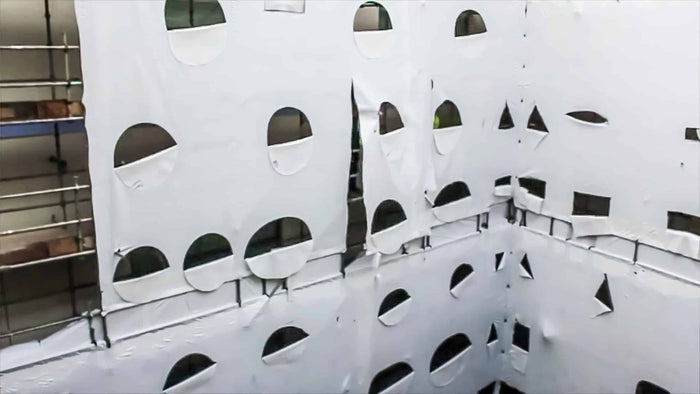
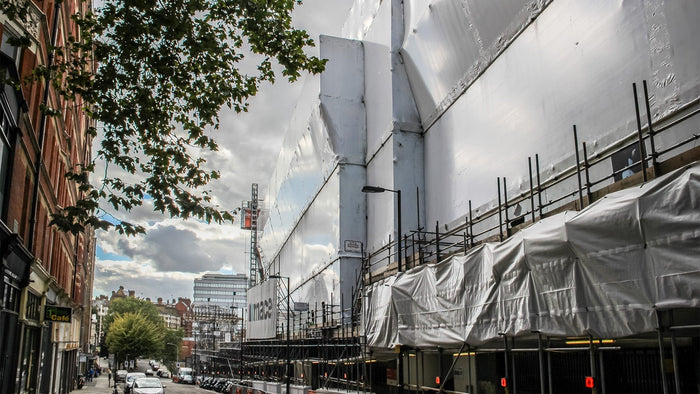
What Is The Best Way To Set Up a Scaffolding Structure For Shrink Wrapping? Rhino Shrink Wrap sheeting is a versatile covering for scaffold structures of any dimension or shape. However, following the guidelines on this page when the structure is being erected will make the shrinkwrap covering easier to install, more effective, and a professional appearance. Preparation is the key! These notes are intended as a general guidance to setting up a scaffolding structure to get the best result from your shrink wrap sheeting. However, as with all types of scaffold sheeting, always seek the advice and guidance of a qualified scaffolding designer to ensure that your structure can withstand the additional wind loading that will result from the application of sheeting. Scaffolding must be complete and inspected prior to shrink wrap installation Introduction A scaffold which is to be shrink wrapped should be erected in line with the NASC’s TG20:13 guidelines. As of June 2014 it is the only guidance that is acceptable to the Health and Safety Executive. TG20:13 has been issued as the industry technical guidance on the use of the European Standard BS EN 12811-1 and applies to all tube and fitting scaffolds. It may seem obvious, but the first thing to consider is that shrink wrap sheeting requires a support structure wherever the weather protection and / or containment is required. You might be surprised how many times we are asked to fix sheeting to an area where there is no scaffolding to attach to! Fully boarded access, complete with handrails, is required to every part of the scaffolding that requires sheeting. The scaffolding should be complete and inspected (Scaff Tagged) prior to shrink-wrap sheeting installation. It is the responsibility of the client / scaffolder to ensure that the scaffold is designed & built to withstand any wind loadings resulting from scaffold sheeting. (This is the case with all types of sheeting – ‘Monarflex’, shrink wrap etc) Protrusions Apart from having a huge impact on the appearance of your shrink wrap scaffold sheeting, a scaffolding with lots of protrusions will slow up the daily installation rate. It will be hard to get the sheeting straight and although cutting around protruding tubes is a relatively quick process, resealing and taping around tubes can be time consuming. Alternatively, a flush scaffolding with dedicated sheeting rails can make the daily installation rate much faster. The amount of shrink wrap sheeting that can be installed in a day has an affect on the price. For more information on shrink wrap pricing / costing factors click here. Ledgers Ledgers should be flush with the main body of the scaffolding. Although it is possible to cut shrink wrap around a protruding scaffold tube or scaffold board (and then tape / heat weld the shrink wrap back together) this can make fitting the shrink wrap very time consuming and will not look very tidy. Furthermore, even after resealing the shrink wrap around a protruding scaffold tube it is going to be very difficult to achieve 100% containment or weather protection. Handrails Handrails should be installed so that they are flush with the main body of the scaffolding. Sometimes a handrail will be used where a horizontal join between sheets of shrink wrap is required. Standards Standards should be flush with the main body of the scaffolding. Boards Scaffold boards should be flush with the main body of the scaffolding. Protrusions through shrink wrap sheeting Flush tube and fitting scaffolding structure Heat shrink sheeting around scaffold fittings Sheeting rail used on edge of small temporary roof Sheeting rail to hold wrap away from fittings Sheeting rails A sheeting rail, installed every other scaffolding lift, can improve the appearance of a shrink wrapped scaffolding by holding the sheeting away from scaffold fittings. Although the shrink wrap is shrunk ‘drum tight’ so that it molds very tightly around fittings, over long periods of time, in windy locations, fittings can start to cause holes in the sheeting. Although these can easily be repaired using shrink wrapping repair tape, a sheeting rail can help to prevent holes. Final seal Final seal is required for projects that require total containment. It is particularly important that the scaffolding structure is flush and protrusions are minimized. A scaffold tube should be installed parallel to and as close to the ground, wall, ceiling etc. The main body of the shrink wrap sheeting will be secured to this tube. A shrink wrap skirt will then be welded / taped between this tube and sealed to the floor / wall / ceiling using wooden batten or adhesive. An alternative technique is to put scaffold boards on the ground and build the scaffold on top. The shrink wrap sheeting can then be battened to the boards at ground level and provide an effective final seal. Final seal Joining Shrink Wrap Sheeting (Scaffolding) Horizontal join (viewed from outside) Horizontal joints between sheets Shrink wrap sheeting is normally supplied as a 7m wide x 15m long roll. Although it can be hung any way up, the usual process is to use the 7m width of the sheet to cover 3 ‘lifts’ of the scaffolding. 3 lifts is the largest ‘drop’ we recommend. For some projects, it may be preferable to reduce the drop to 2 lifts or even 1 lift if very high wind speeds are likely. When shrink wrapping scaffolding that is higher than 6m, it is therefore necessary to make a horizontal join between sheets. The most robust way of making this join is to run a double scaffold tube around the scaffolding at the height where the join is required (approximately every 6 meters). The double tubes should be positioned close together, (5-10 cm is ideal). Sometimes the double tube of the scaffolding handrail is used as a horizontal joining point for shrink wrap. This is acceptable, however, because handrail / guardrail tubes can be up to 47 cm apart, this can lead to more shrink wrap film being used than is strictly necessary to complete the job. In this way, each section of shrink wrap is attached separately to the scaffolding structure and each one is fitted behind the other (like tiles on a roof). Want to learn more about creating horizontal joints between shrink wrap? Watch the video below. Where do you want the scaffold sheeting to end? Shrink wrap scaffold sheeting needs to be secured before it is heat shrunk ‘drum tight’. Install a ledger at the point where the shrink wrap sheeting is to finish. A handrail can be used for this purpose. Bottom ledger Temporary roof Temporary Roof Structures Shrink wrap sheeting can be used as a temporary roof covering, either to provide temporary weather protection or environmental containment to a construction project. To shrink wrap a temporary roof safely you should bear the following points in mind; General points; Any roof scaffolding which is to be shrink wrapped must be constructed to allow rainwater to drain easily from the roof surface. The minimum pitch of a shrink wrap temporary roof scaffold should be 10% or 1:10. The installation of shrink wrap sheeting to create a temporary roof will require the installer to access the top surface of the roof. For this reason it is important to set up a handrail around the roof edge / perimeter of the roof. The handrail provides edge protection to the installers and allows the installers to set up and tension safety lines between handrails if required. (NB that where safety lines are used, it will also be necessary to have a rescue plan and operatives trained in the use of casualty recovery equipment such as the ‘Gotcha’ rescue kit by Spanset – spanset.co.uk) Having a handrail around the roof edge does not cause significant problems for installing the sheeting. This is because we always recommend shrink wrapping the sides of the scaffolding first and then overlapping the sheeting by 30-40cm onto the top surface of the roof. This means that the side sheet only needs to be cut to go around the handrail stanchions by 30-40cm from the edge of the sheet. Subsequently, when the roof sheeting is unrolled it in turn is overlapped over the edge of the roof and down the sides of the scaffold sheet by 30cm. This means that the roof sheet only needs to be cut around the stanchions by 30-40cm from the edge of the sheet. The roof sheet and side sheet are then joined by heat welding them together. Finally, patch tape is used to make a seal around the base of each stanchion. What is the size of your temporary roof? Small roofs / canopies (up to 5 meters width) For a small roof (where there is ‘arm’s reach’ access to the entire underside of the roof) then no additional boards are required to be installed in the roof structure. This also applies to where a canopy is required over the top lift of the scaffolding. As long as the installers can access the underside of the canopy from the top boarded lift then no additional boards are required. Medium sized roofs Where possible, the temporary roof should be fully boarded out with scaffold boards. This will allow the installer to easily access every part of the shrink wrap roof covering to create welds between sheets and to heat shrink the film ‘drum tight’. Secondly, the boards provide an anchor point for the scaffold shrink wrap film. Once the shrink wrap has been pulled over the temporary roof structure, the installer will batten the shrink wrap to the boards at 1-2 meter intervals. It is therefore important that the boards are properly and securely clipped / fixed to the roof structure as there will be wind loadings applied at these points. Large roofs Where it is not possible to fully board a temporary roof structure, (perhaps due to weight restrictions) then a run of boards, three boards wide, every 2 meters (2 meter centers) is the minimum requirement with run of boards around the roof edge. Small temporary roof covering Fully boarded mid size temporary roof Partially boarded large temporary roof
How to Shrink Wrap a Boat?
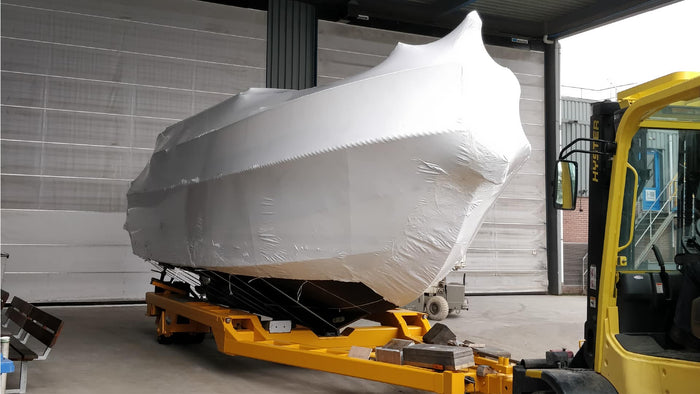
Pre-start checks & padding Pad sharp edges and protect any delicate items which might be damaged by shrink wrapping. Seal hull fuel vents (they will be pushed through cover later on). Turn off any gas bottles inside the boat. Fit webbing support structure & perimeter band For larger boats, create a webbing / strapping support structure for the shrink wrap, over the bow, flybridge or cockpit areas to create strength and stop water from pooling. Spread shrink wrap & weld it around perimeter band Unroll and unfold shrink wrap film. Place the shrink wrap film at the stern of the boat. Pull the shrink wrap up and over the boat to the bow. The shrink wrap needs to be wide enough to go over the highest point of the boat and down to the perimeter band on each side with an extra 30cm / 1ft to wrap around the perimeter band. Cut wrap from the roll. Weld folds / pleats & shrink the cover ‘drum tight’ Because a boat is a complex shape, there will be parts of the shrink wrap cover (particularly at the bow and the stern) where the shrink wrap must be trimmed, folded and heat sealed. After that begin applying heat at the bottom of the cover at the stern and shrink up to the rub rail. Starting at the bottom of the cover allows the heat to rise and helps you shrink more quickly. Next, shrink the top of the cover. Fitting air vents & zipped access (if required) When the cover is completely shrunk, check for burn or puncture holes in the cover. Repair using shrink wrap tape. Air vents are recommended if the boat is to be stored whilst shrink wrapped. Tape the zipped access door into position on the finished shrink wrap cover. Open the zipper and use your safety knife to carefully cut the shrink wrap away. Note: Once all hot work (i.e. heat welding and shrinking is finished), remember to remove tape from fuel vent.
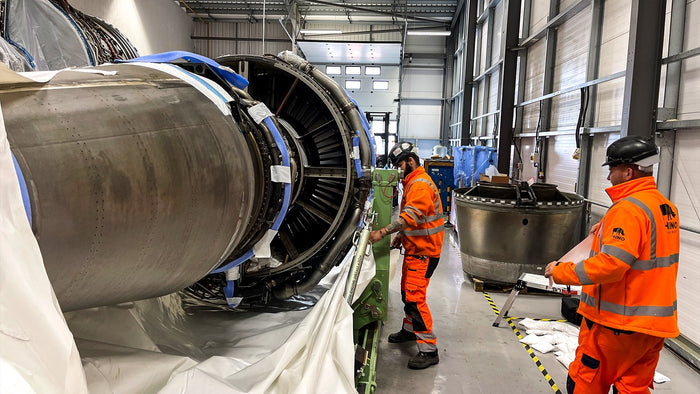
How to Shrink Wrap a Machinery & Equipment?
Introduction Industrial products such as machinery & equipment being stored or transported need protection but tarpaulins usually get shredded in the wind. Industrial grade shrink wrap sheeting is also often used for creating very tight fitting transport covers which protect large products against weather damage during transport by road or during storage outdoors. This guide is intended to be an overview of the industrial shrink wrap process. However, shrink wrapping requires the use of a hot air gun and often involves working at height. Before any shrink wrap job is attempted, ensure that you have received appropriate training that you adhere to your local health and safety regulations. Complete Encapsulation Method This method is used when the object to be shrink wrapped can be rolled or lifted on top of a shrink wrap ‘base sheet’. Place base and cover sheets Measure the item to be shrink wrapped and cut a shrink wrap base sheet approx. 50cm larger than the item on all sides. 2. Measure the height and width of the item to determine the roll width to be used. Preparation & covering Pad sharp edges and protect any delicate items which might be damaged by shrink wrapping. If there are large ‘voids’ then it is best to install a ‘temporary support structure’ for the shrink wrap film using woven strapping every 2m. For industrial shrink wrapping it is generally easiest to put the roll of shrink wrap on a roll stand at ground level so that it can be unwound easily. Using a stand also keeps the shrink wrap film off the ground and so keeps it clean and free from damage from stones which may cause small holes in the shrink wrap. Small holes are not a huge problem, but they will tend to enlarge as the cover is heat shrunk drum tight and will need repairing with patch tape afterwards. Remember to position the film on the stand so that as you unroll it, the folds of the film are facing upwards. This will help to stop it snagging when you unfold it. When shrink wrapping large products outdoors we always tape over the folds on the very end of the shrink wrap. This means that the shrink wrap can be pulled over the object as a narrow strip, and stops the wind catching the folds. Once pulled over the object, the film can then be cut from the roll and unfolded. Welding/battening & Shrinking Depending on the securing method used (see ‘planning’ above) the shrink wrap film is then battened, welded around the perimeter band or welded to the shrink wrap footprint that has already been placed underneath. Although the heat shrink process will remove wrinkles and creases, you should always try and pull the film as tight as possible during the fixing and welding stage. Finally, you can now begin shrinking the cover to get that ‘signature’ drum tight finish you are looking for. Using a propane gas hot air gun, start at the bottom and shrink upwards, using a technique similar to spray painting as you heat the cover and chase any wrinkles and creases away from you. You should try and shrink the cover in a systematic way, completely shrinking one area before moving on. Going back over an area that has already been partly heat shrunk may eventually start to thin the shrink wrap film and eventually create a hole. Always use the heat gun sparingly around any areas which have already been welded. Shrink wrap film, once welded / heat shrunk, will have a tendency to make a hole when you go back again to finally shrink the cover. Although these small holes can be fixed using shrink wrap repair tape, lots of repairs will affect the finished appearance of the job. To get the best results you should try and heat shrink 100% of the surface are of the cover. However, depending on the shape of the product you are covering, heat shrinking the sides may pull the shrink wrap over the top of the object ‘drum tight’ without additional use of the heat gun. Fit air vents & zipped access doors Fitting a zipped access door or hatch is not essential but can be useful for some applications. The most common type of door features a ‘U’ shaped heavy duty zipper which is sewn into a rectangle of polythene. When the shrink wrap sheeting has been fully installed and heat shrunk ‘drum tight’ the door is taped into the required position using shrink wrap tape. Finally, the door is unzipped and the shrink wrap cut away to create an opening.
How to Shrink Wrap Scaffolding?
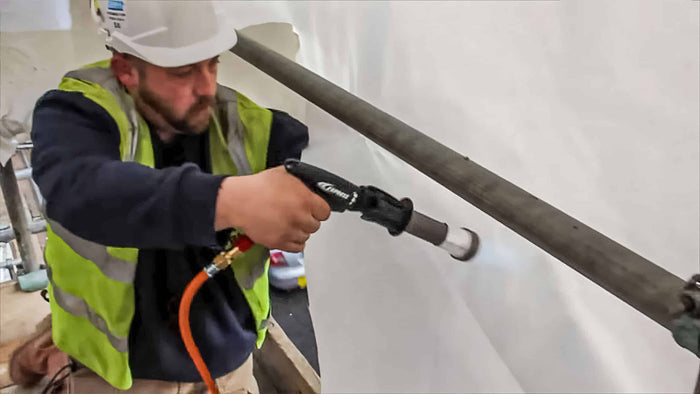
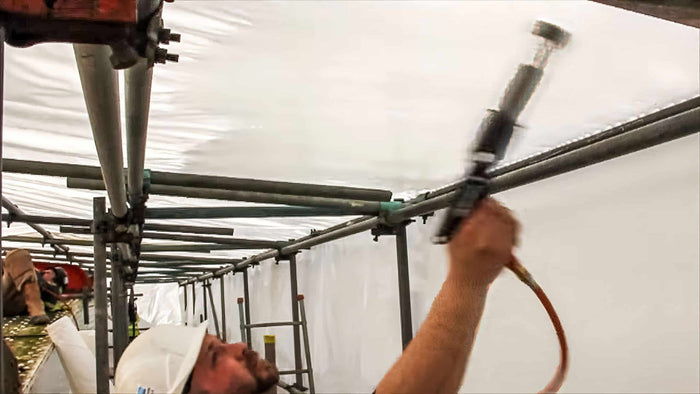
How is Shrink Wrap Different? Shrinks ‘Drum Tight’ – no site visits to repair wind damage Welded Joins Between Sheets – better ‘containment’ & weather protection Improved Appearance – happy customers & more repeat work Setting Up For best results, scaffold structure should be flush. Shrink wrap can be cut around protrusions but it can affect performance and appearance. For external shrink wrap sheeting maximum untied vertical distance for scaffold shrink wrap = 3 lifts/ 6m. The Scaffold Shrink Wrap Process Hang Weld Shrink Hang Take care not to drop rolls or snag sheets of shrink wrap during installation. Avoid installing shrink wrap sheeting in winds >20 mph Overlap shrink wrap around scaffolding tube by 30-40cm and use clip to hold before heat welding. Weld The propane gas gun bonds overlapped areas of shrink wrap together. Shrink The heat gun is used to shrink the scaffold wrap ‘drum tight’. Hold the gun 30-40cm from the shrink wrap and work the heat over the shrink wrap – like spray painting To repair small holes after heat shrinking use Patch Tape. Larger areas can be repaired by cutting a patch of shrink wrap and heat welding into position.
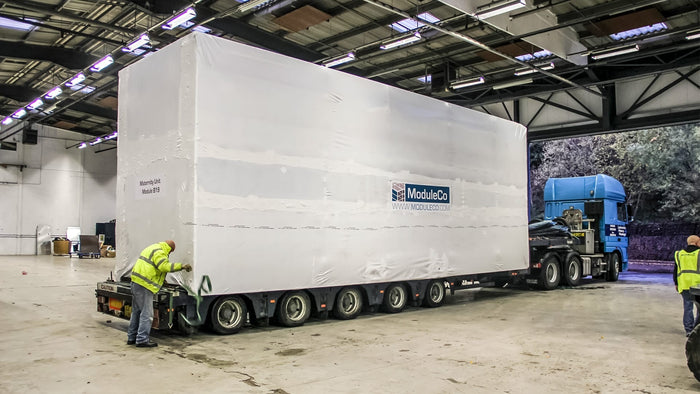
How to Shrink Wrap a Modular Buildings?
HOW TO SHRINK WRAP Module Preparation If module has large, completely open sides, Install additional support using timber bearers or cargo lashing at approx. 2m (6’) distance apart. Cover large roof voids, (such as for for stairs), with timber bearers and plywood to prevent accidental falls. This will also stop rain or snow collecting and damaging the cover. Pad sharp edges or extremities. Not always required. Module Shrink Wrapping – Full encapsulation ‘Full encapsulation’ describes the application of shrink wrap to all 6 sides of the module. Apart from providing maximum protection, a benefit of the full encapsulation method is that no screwing into the module or additional fixings are needed. Can I use a shrink wrap bag? For pods and very small modules it is possible to use a shrink wrap bag. However, for modules over 4m long, it is more cost effective to use shrink wrap in sheet form and fold / heat weld around the module. Ask about our custom cut ‘shrink wrap module kits’ which help to reduce wastage and ensure a consistent wrap each and every time. Shrink Wrapping – Part Encapsulation / Sides only The ‘sides only’ method can be applied to all sides of a module if required. Note: Vertical battens are not required for adjoining sections. Part Encapsulation / Perimeter Band For some modules it may be possible to secure the shrink wrap to the module by wrapping around a perimeter band of cargo strapping / woven lashing before heat welding the shrink wrap back on to itself. Note – This will only work on modules where there are lifting eyes or an edge around the base of the module. Otherwise, when you try to shrink wrap cover, it will ride up and leave the bottom of the module without protection (the cover will also lose that ‘drum tight’ finish that we are looking for).